


泪之石中文版图文版完整攻略
时间:2015-03-10 作者:游乐小编
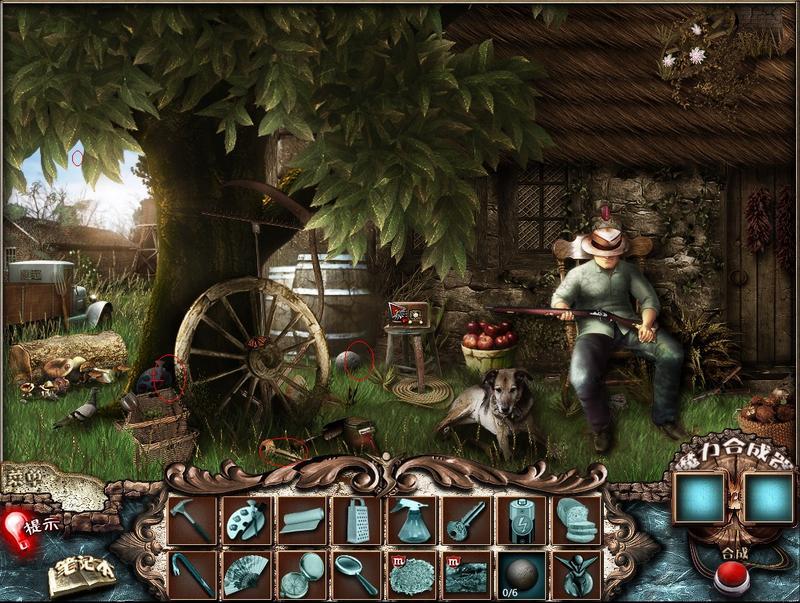
第一章 Chapter 1
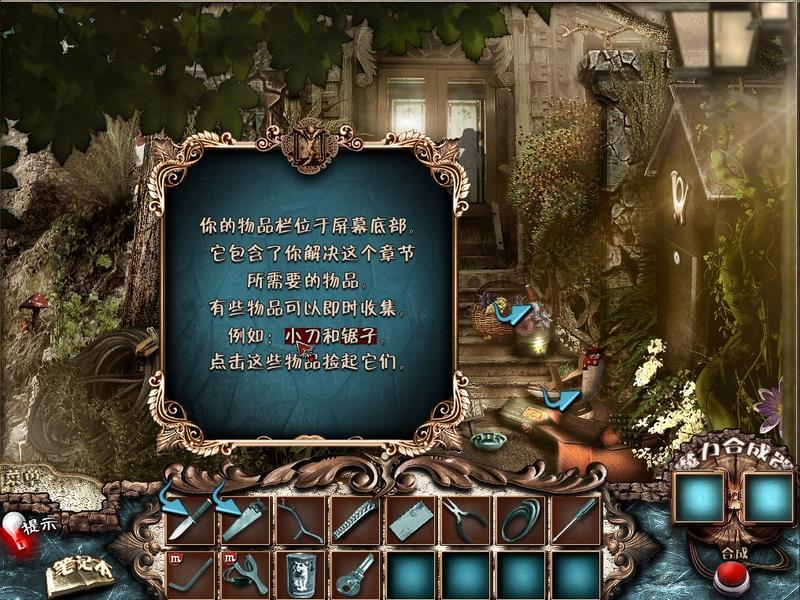
这一关没什么需要动脑的地方,里面都会提示你怎么做,而且这是中文版的,我相信来玩这游戏的都能看懂中文吧。就不多说了。我只象征性的截了几张图哈。
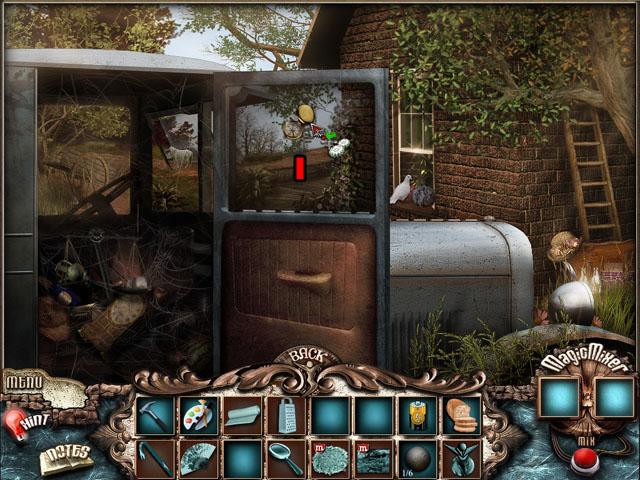
进这里后主要是拿那个钳子和线合成一个撬棍把这个箱子撬开,拿到猫粮和信,我们就返回刚刚那。

先用猫粮给猫猫喂食,猫猫走后刚刚蹲的地方会出现一个起子,拿着去开95号暗箱,我们就可以得到车钥匙了。
到这里,我们拿到车钥匙后,就可以开着我们的“梦想家1号”去追寻我们的教授老朋友,帮助他解开那些未解之谜咯~~第一章完。
第二章 Chapter 2
我发现截图是件很浩大的工程,我就偷懒从国外的网站找到的图片用下好了,我会用中文注释清楚的哈~
这个还是中文的截图,后面就没截了。
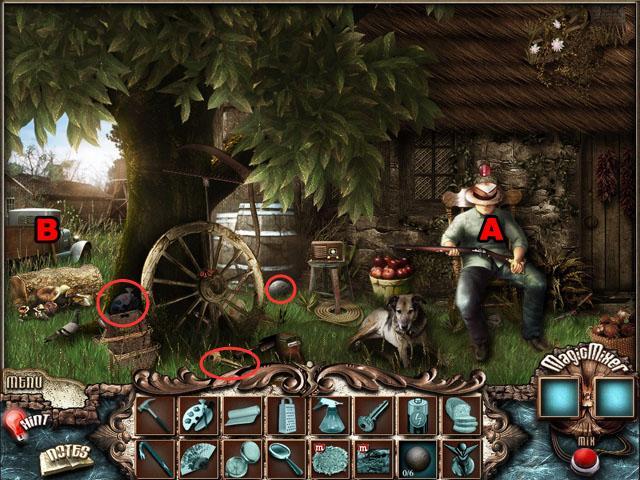
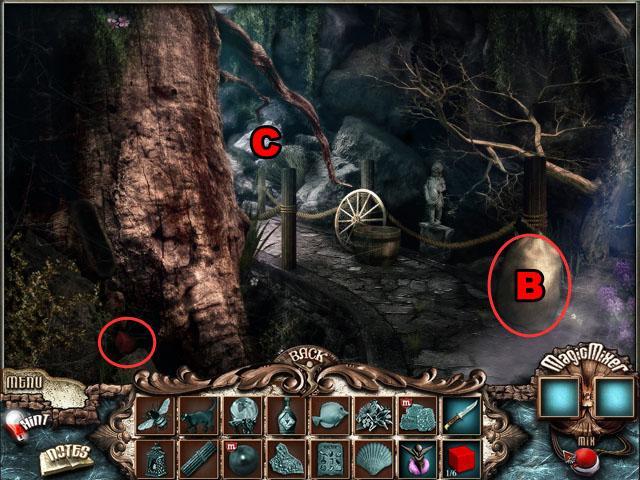
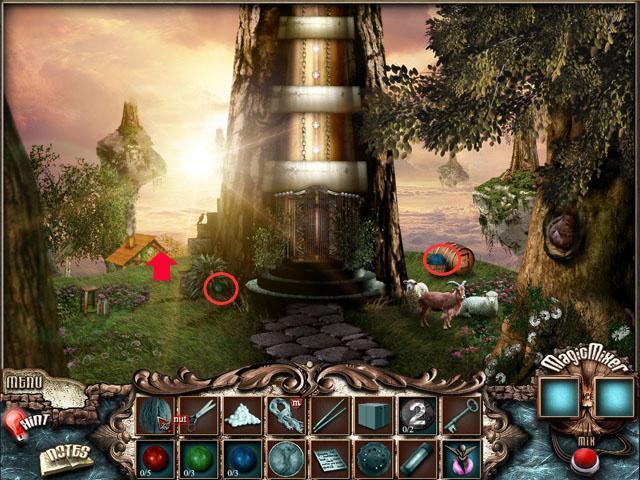
A.这一关我们首先到的是一个急着会周公的大叔家门口,一会我们就想办法让他睡着哈,不然他不然我们进他屋子,他手上有枪,咱总不能硬闯吧,O(∩_∩)O哈哈~
然后拿上图上标记那3个地方的画板、球还有钥匙我们就可以去B处了。
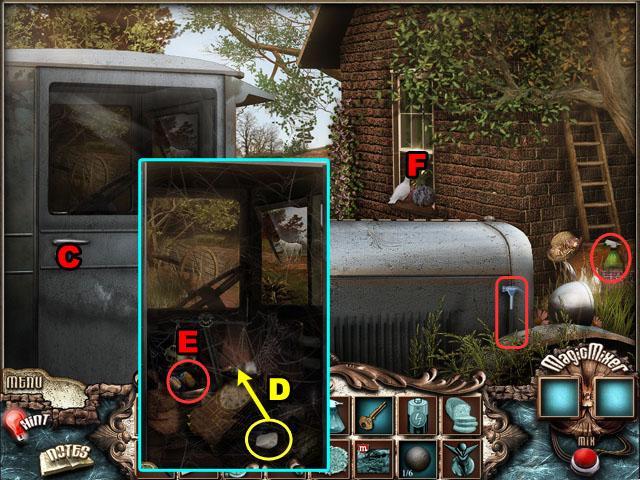
到了这先把锤子和杀虫剂捡起来,然后用在大叔家门外捡到的钥匙打开C处的车门,把D处的石头放到天平上,这时候E那也就是天平的左边会出现个电池,拿上它。我们就可以从F处跳窗进去了(貌似干的都是些惊险的事哈)~~
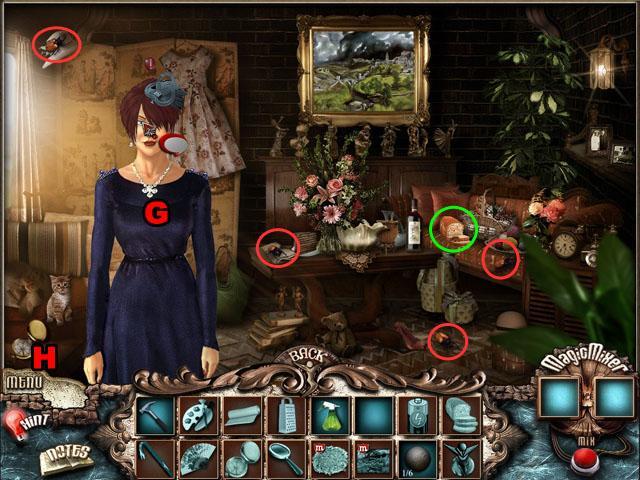
来到了姑娘的屋子,先拿杀虫剂把红色标记的讨厌的4只虫子杀了吧。这时姑娘为了感谢会给我们个指南针,这么好的事现实会有么,我们是跳窗进去的吧!!然后拿上桌上的面包~~走的时候姑娘会拜托我们帮她找回她丢了的扇子、我们拿了人家的东西,这个忙时肯定要帮的咯~~
出来后,拿出指南针去后院。
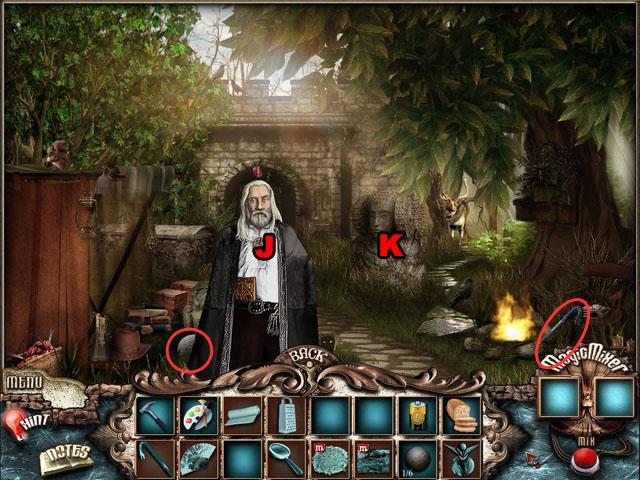
来到这,先和白胡子大叔(J)交谈(这是到每个场景都会先和NPC交流触发任务哈,后面我就不重复说了)。
把大叔身后的球和火堆边的撬棍(长得好像伞把哦)捡起来。
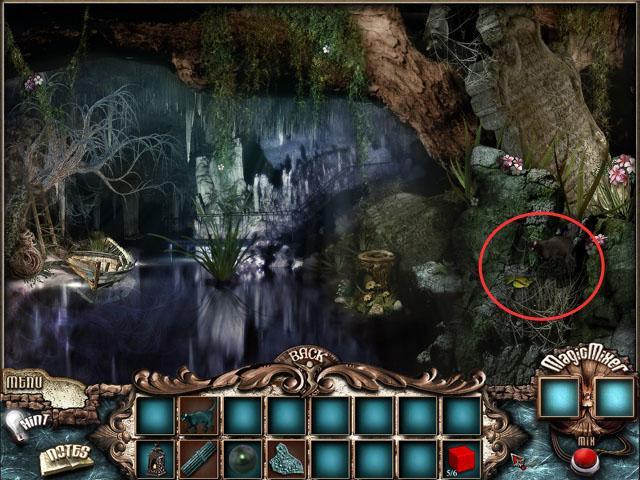
然后去后面那个大耳朵石像那(K)。
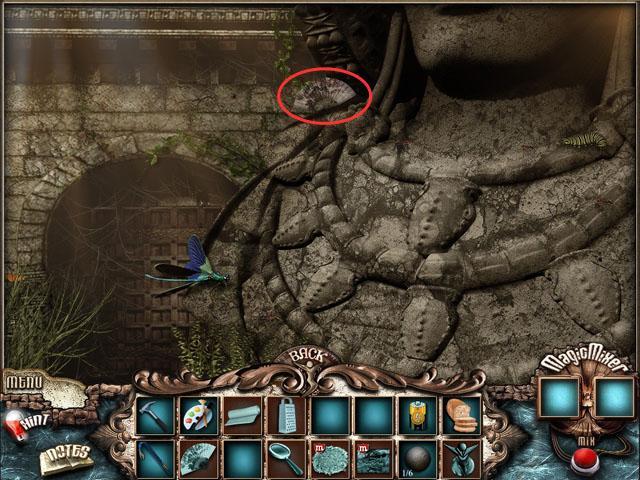
在石像的肩膀上你会看到一把扇子,还记得是姑娘让我们帮她找回的哈,这时鼠标过去石像胸前有红色齿轮样的,说明我们还有任务没完成,后面还回来开启这的机关的。然后返回。
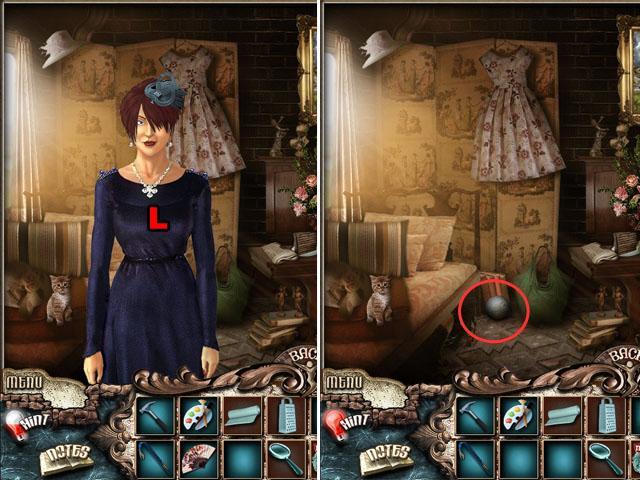
把拿到的扇子给女人(L),然后捡起她所站位置后面的那个黑球。
返回第一个场景。
给大叔身边的那个使用在车上拿到的电池,这时大叔听着音乐就会睡着了。
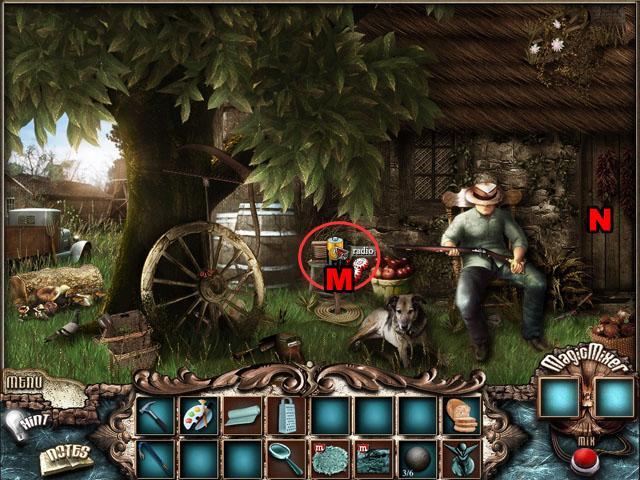
现在你有可以进入房子(N)的权利了。
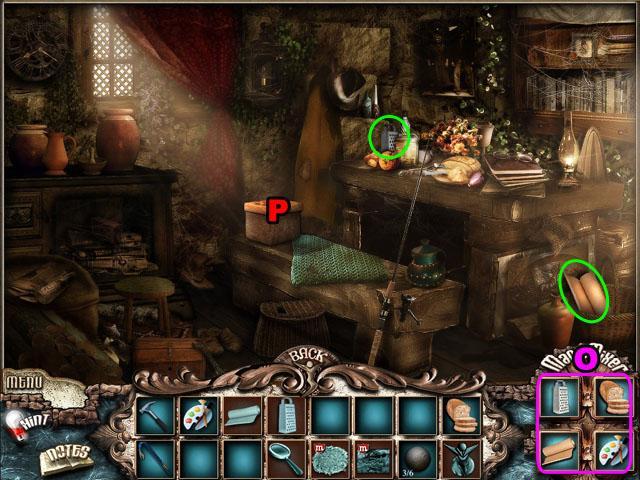
在屋子里,收集桌子上的搅拌机还有篮筐上的画纸。
这时你的物品栏里的东西可以合成了,把面包和搅拌机一起合成面包屑,画纸和调色板一起合成一幅假画。(O)
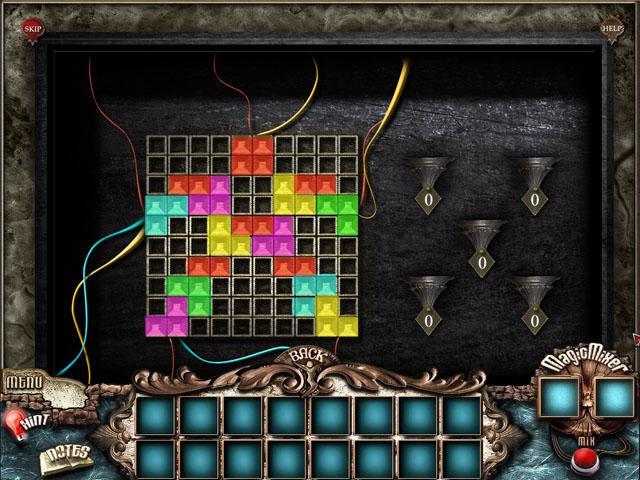
点击长凳上的篮筐可以开始第一个迷你小游戏。(P)
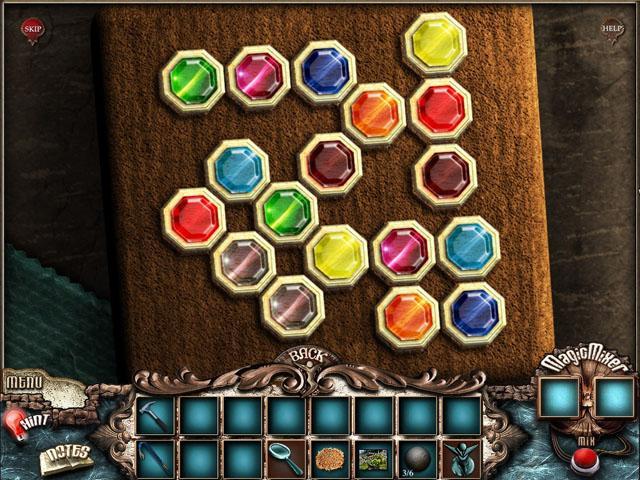
接下个就是完成这个迷你小游戏了,就是点击那些六边形的方块,连续点开2个相同颜色的就是成功了,直到所有的方块都显示出来,这个小游戏就结束了。完了后盒子打开会给你个球。
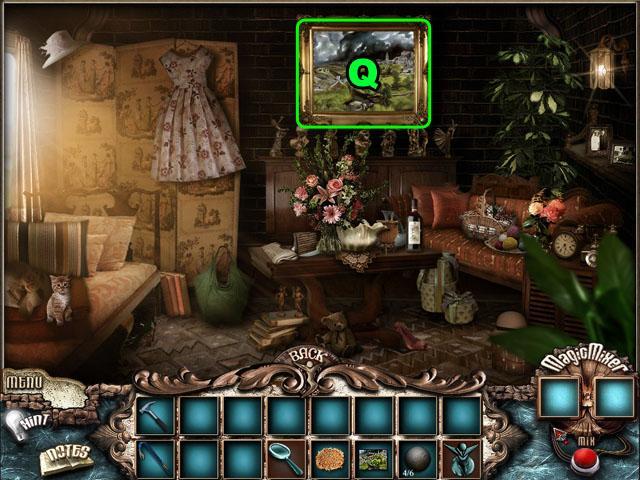
返回女人的房子,对着墙上的画(Q)使用我们做出来的假画,这时会开始下个迷你小游戏。
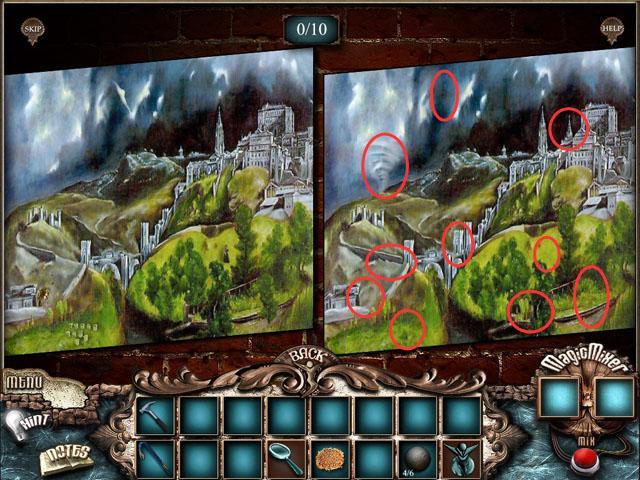
这个小游戏其实就是“大家来找茬”,找出两幅画之间10个不同之处。
点击那些不同的地方,假画就会相应的进行修改。
其实这个小游戏不一定10处全部要找出来,你找了几处后看左上角那个“跳过”键亮了就可以点击跳过了。
完成后会得到一幅提示的画,后面能用上的。
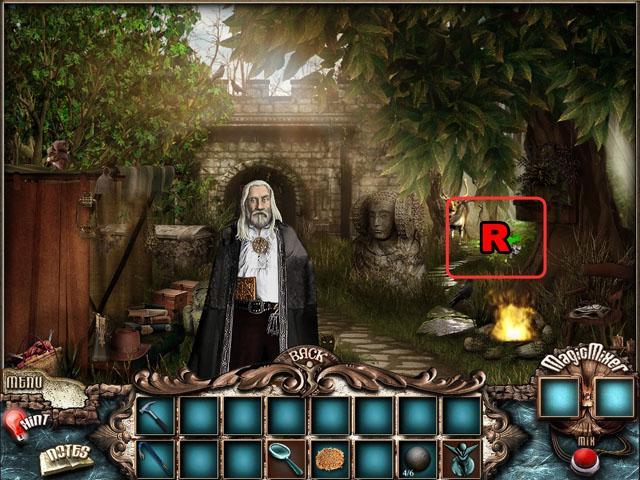
这时来到白胡子大叔站的树林里。
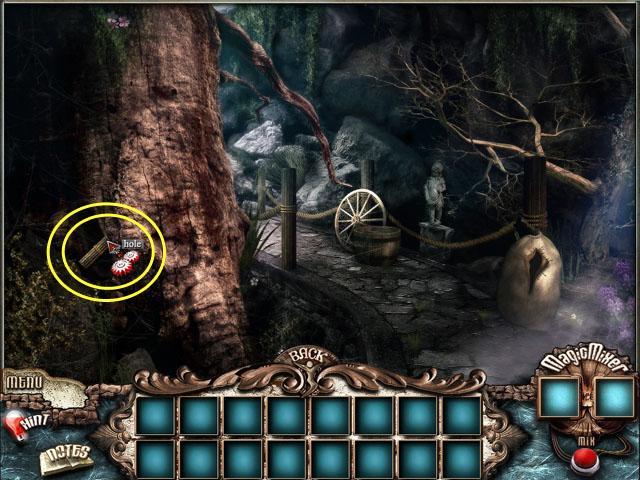
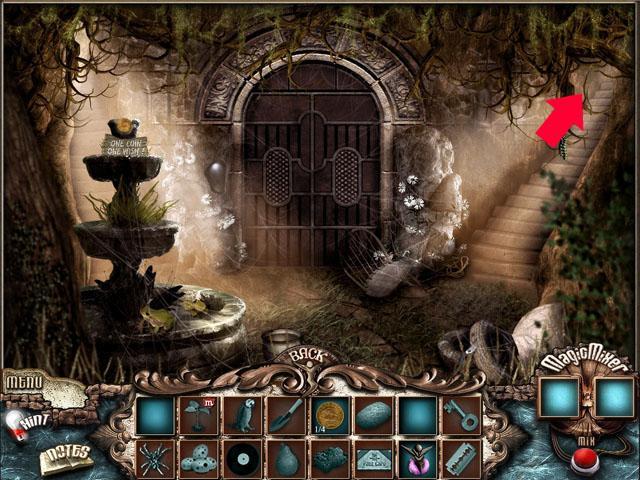
我们先去后面的废墟。(R)
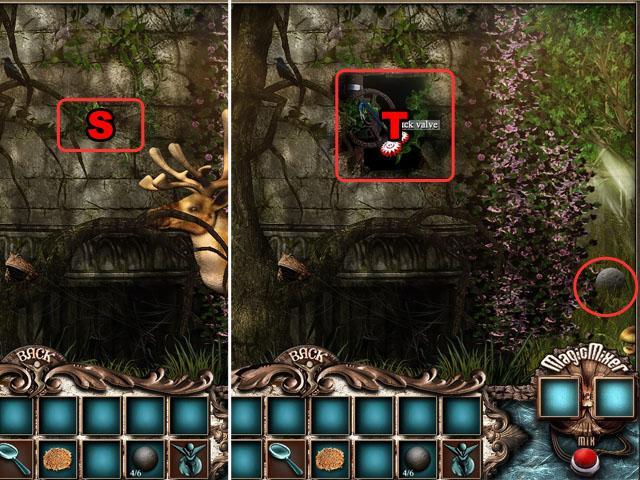
在墙壁上使用锤子打破它(S)。
鹿会离开现场,您可以捡起角落里的铁球。
使用撬杠卡住阀门,将其打开(T)。这时会听见前面的水声。
退出这一领域回到前一个场景。

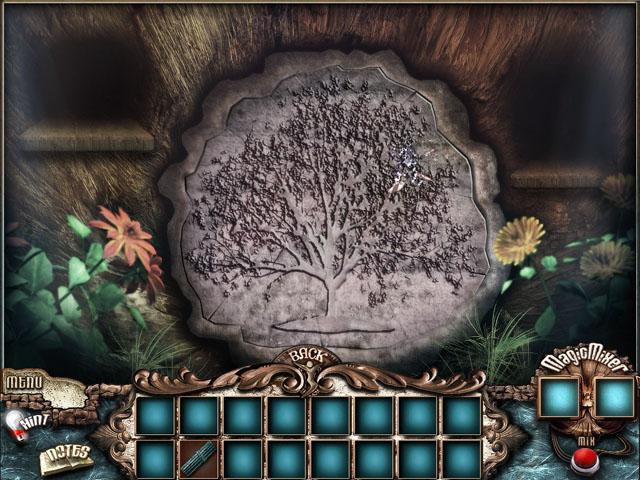
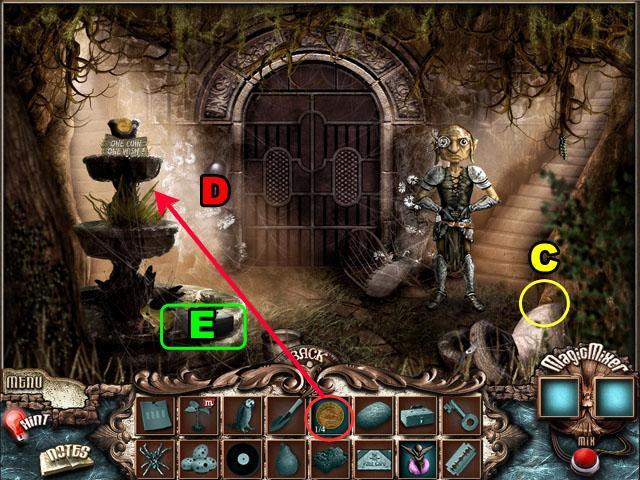
点击树上的花篮喷泉开始另一个迷你游戏(U)。
这时一个简单的拼图游戏,就是把所有的圆圈放到正确的位置上。
正确的答案如上面截图。
完成后再次和白胡子大叔交谈(V)。
大叔走后捡起道路上的放大镜。
返回的第一个场景,并在后台的日志上使用放大镜。
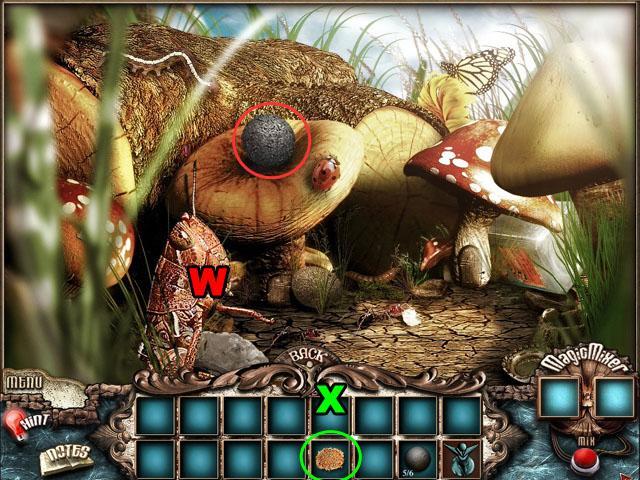
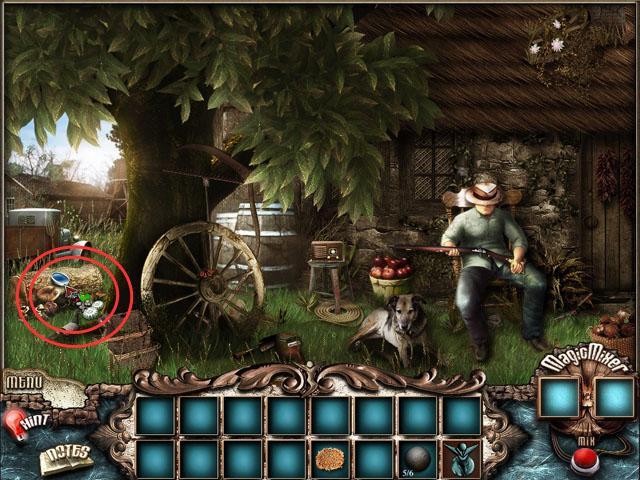
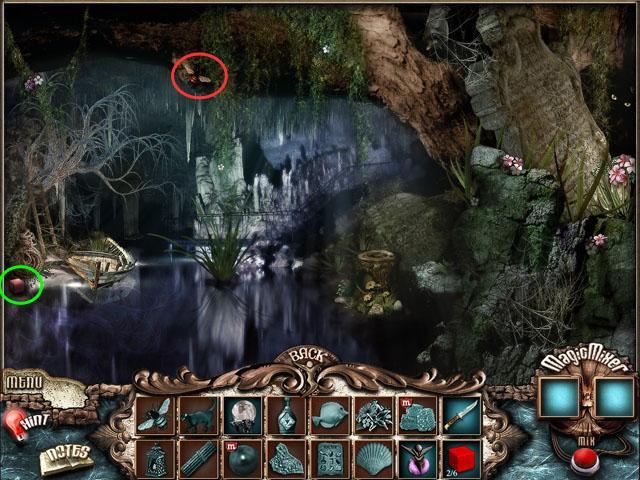
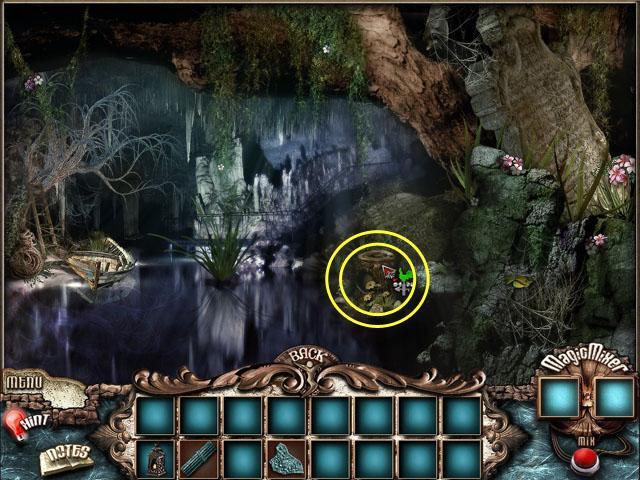
捡起铁球并用面包屑(X)和蚂蚱(W)交换。
蚱蜢会给你一个魔瓶。
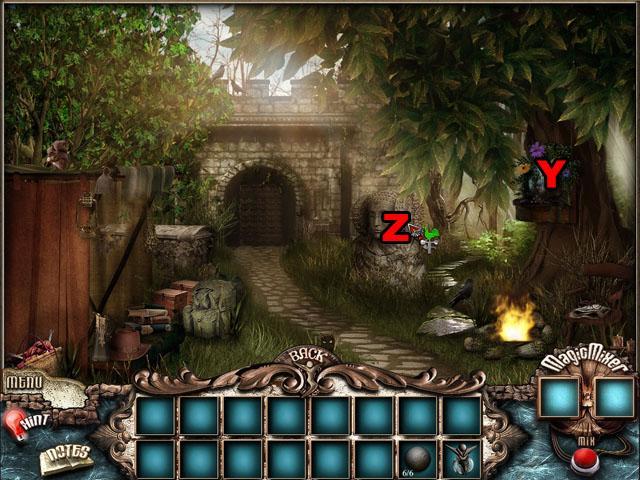
再次返回到树林路径,在花篮喷泉处(Y)激活刚刚拿到的魔瓶,也就是给瓶子灌注魔法的意思。
这时点击放大石头头部雕像(Z)。
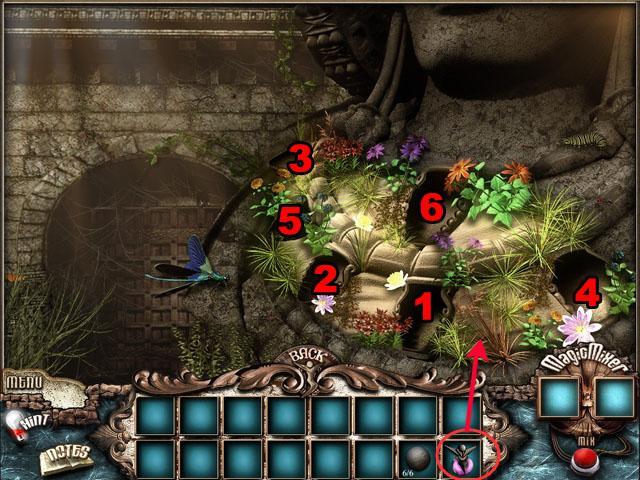
在雕像上使用魔瓶的水。
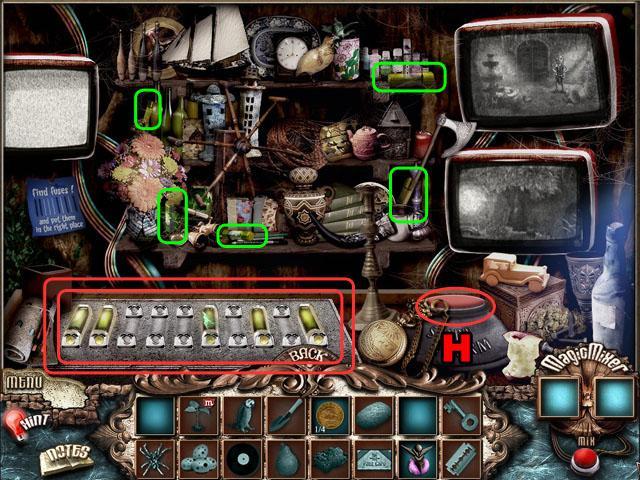
这时参照我们在那个油画找茬之后得到的示意图标示的位置和顺序放入铁球。
完成后就可以顺利开始下一关了。
[page]
第三章 Chapter 3
捡起图上标示的红色方块和小刀。然后去到A所标示的场景。
收集树干下面的红色方块。在那个白色布袋上面用刀子划开,得到一个水晶球。(B)
从树后面绕过去到C位置的另一个场景。
收集蜜蜂和另一个红色的立方体,然后再回到第一个场景。
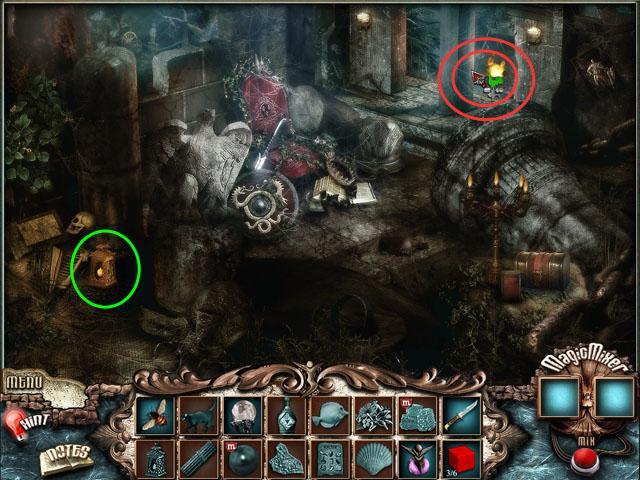
捡起屏幕左下角骷髅旁边的灯,然后去往红色标示的前方场景。
收集在屏幕底部的红色立方体。
进入篝火旁边的小屋。

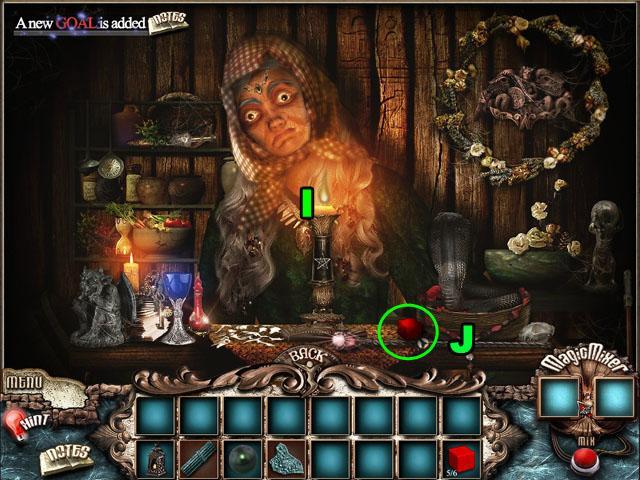
与这个占卜的女人交谈,并把我们拿到的水晶球给她。(D)
这时我们可以拿到药水的配方。(E)
再次与她谈话,会接到一个帮忙寻找她的猫的任务。
然后退出小屋。
使用药水配方点击红圈所标示的区域进入制药台。
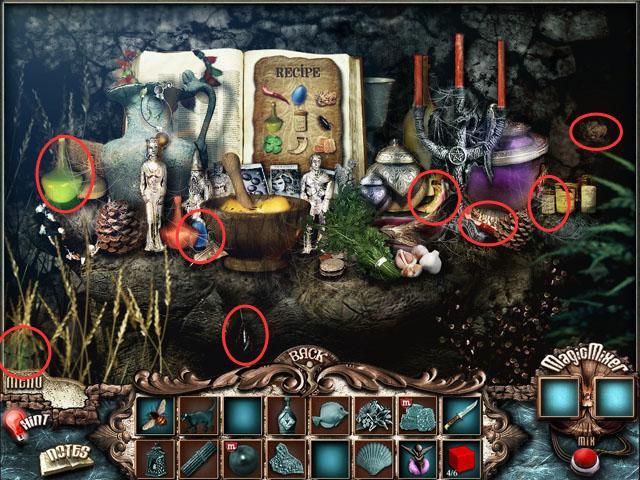
按照配方找到所需要的药材,最后会发现缺少“蜂巢”这味药,于是我们退出制药台,去别出寻找。
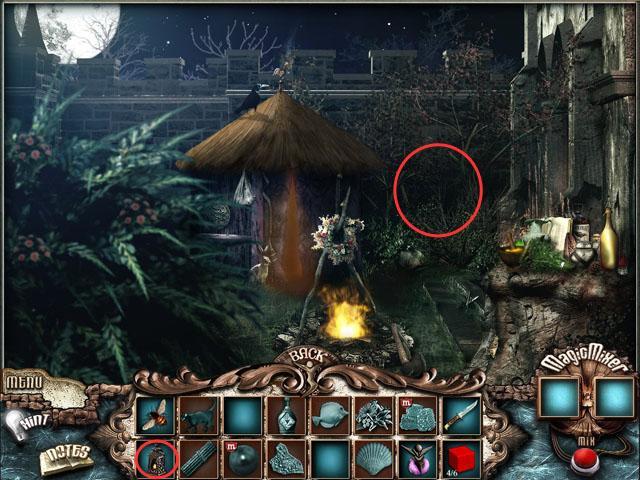
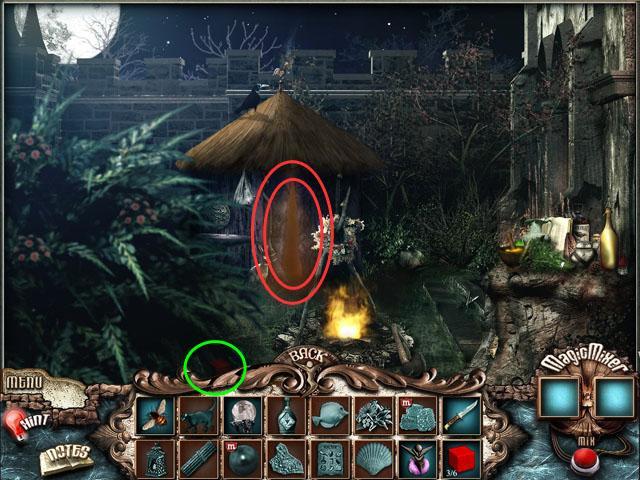
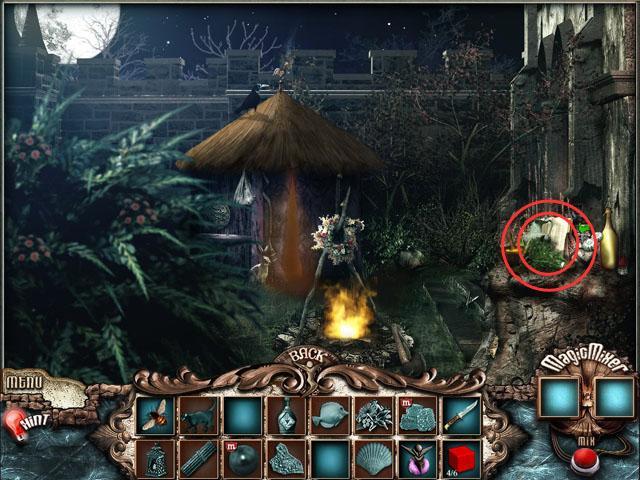
在屋子右侧的小树林使用灯笼的进入一个新的区域。
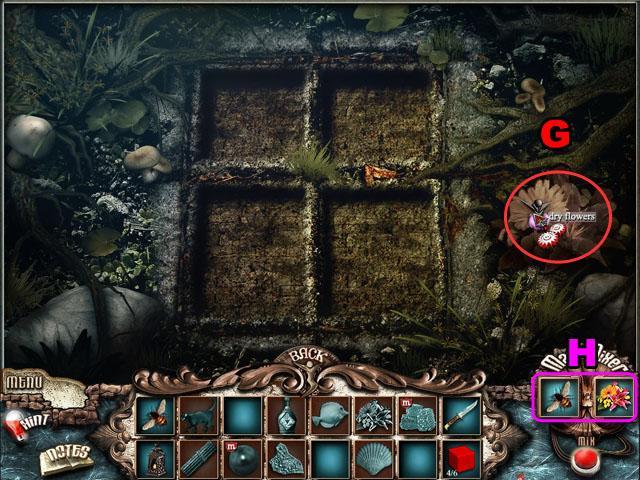
对4个格子右侧的干花使用魔法瓶(G)。
这时候花会复活,我们把花采摘下来,和蜜蜂一起合成蜂巢。(H)
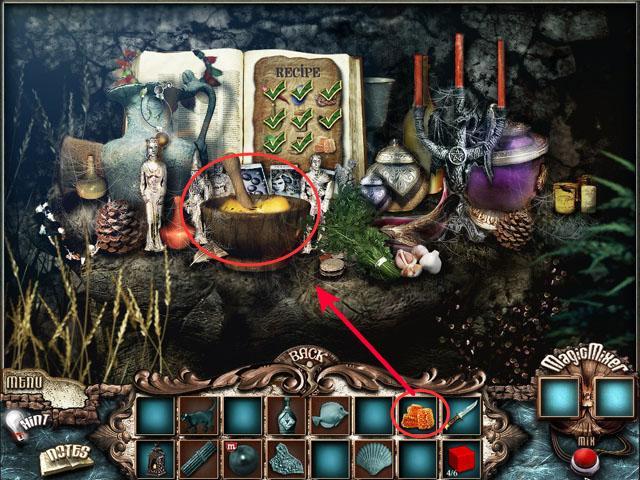
回到制药台。把最后一味药“蜂巢”放入研钵中,便可以制成我们需要的可以在水底闭气的药水了。
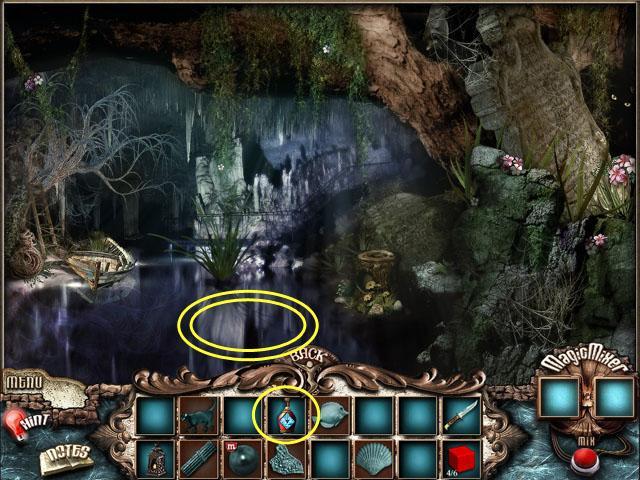
然后来到那棵树后面的岩洞里,对着水面使用刚刚制成的药水,我们就可以下到水底世界了。
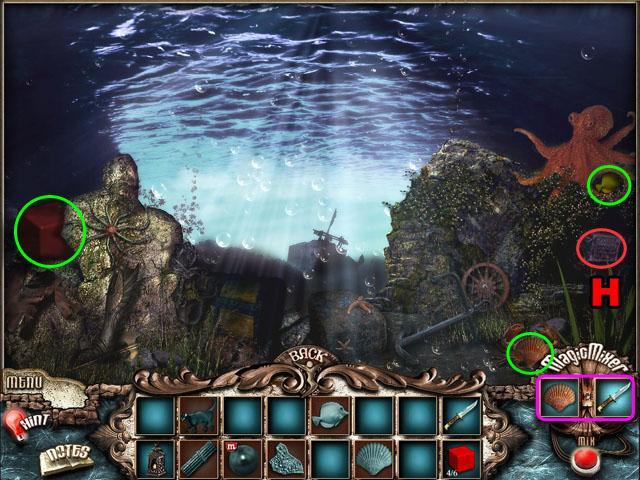
收集贝壳、鱼还有红色方块。
将贝壳和小刀一起合成珍珠。
点击以红色标示的区域(H)。
这时出现一个迷你小游戏。是一个简单的拼图游戏。可以随便拼2下点击跳过就OK了。
然后我们会得到一个指示性的图(如上图),可以帮助解决下个谜题。
回到水面,在红圈所示位置使用鱼把猫猫引出来。
然后带着猫回到那个占卜女人的小屋。
把猫交回到女人手里,我们会得到最后一个红色方块。
然后去到屋子右侧的小树林里。
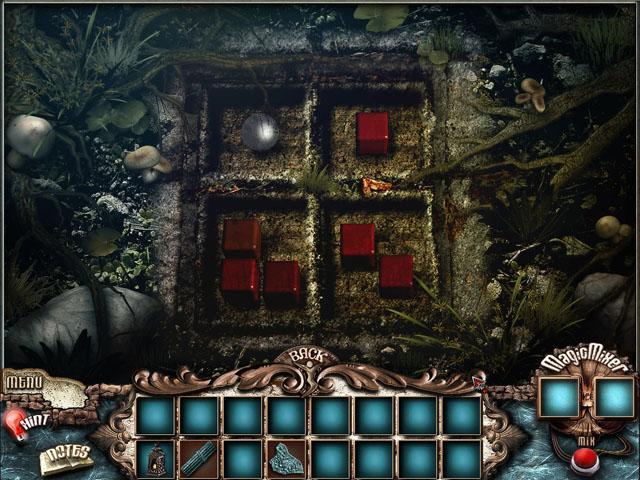
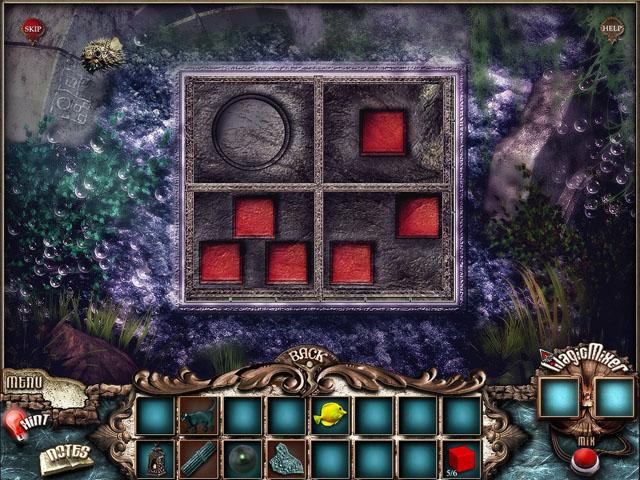
在这,把6个红色方块和珍珠按照之前得到的指示图摆放好,也就是上图所示。
这时候会提示说有处机关已经打开。我们回到这关的第一个场景去。
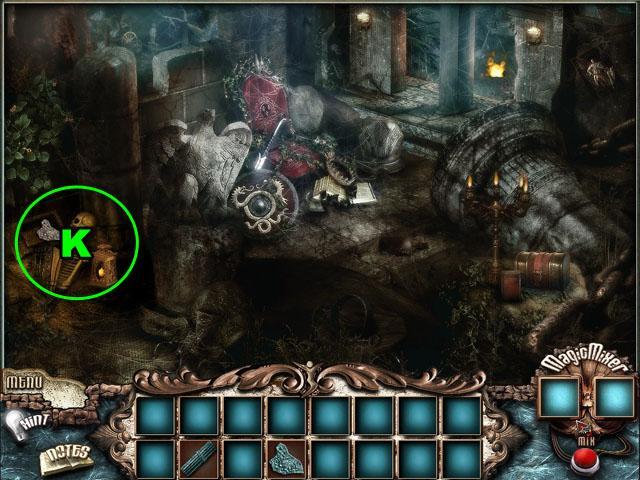
这时(K)出的骷髅旁边出现了一个拼图碎片,拿上它。
我们来到树后面的岩洞里,点击黄圈所在的区域。
然后是一个简单的拼图小游戏。拼好后如图所示。这时会得到一个竹简一样的杠杆。
带上杠杆来到那棵大树边,使用它。这样我们就完成了这一关的所有谜题顺利开启下一关了。
[page]
第四章 Chapter 4
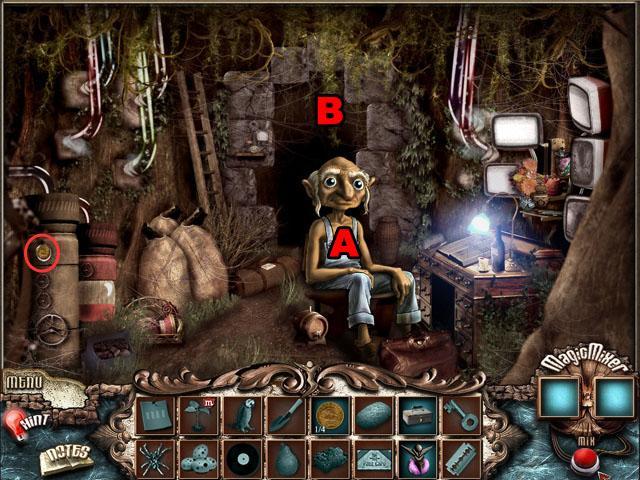
来到这个场景,首先和办公桌旁的老爷爷(A)交谈。(我第一眼看这老爷爷就想到了爱因斯坦哈)
然后拿起左边的硬币。
离开房间去往(B)处。
收集硬币(C)。
在干枯的喷泉(D)处使用硬币,一个硬币可以换一样东西。
拿起硬币换来的工具箱(E)。
返回到第一个房间。

把拿到的工具箱给老爷爷(F)。
等他走后捡起凳子上的控制室的蓝图。
然后点击控制室(G)。
首先拿到绿色线框位置的5个保险丝。
然后对着左边中间那个蓝色面板上的示意图把保险丝装上,空格的位置装保险丝,白线的地方空着。
装好后可以按下警报器(H)。
(最近没时间翻译了,先放英文的吧,应该看图能懂的)
Travel to the fountain scene and go up the stairs to the right.
Notice the office number: 223. (注意办公室门上面的数字,相信很多人忽略这了才卡住的)
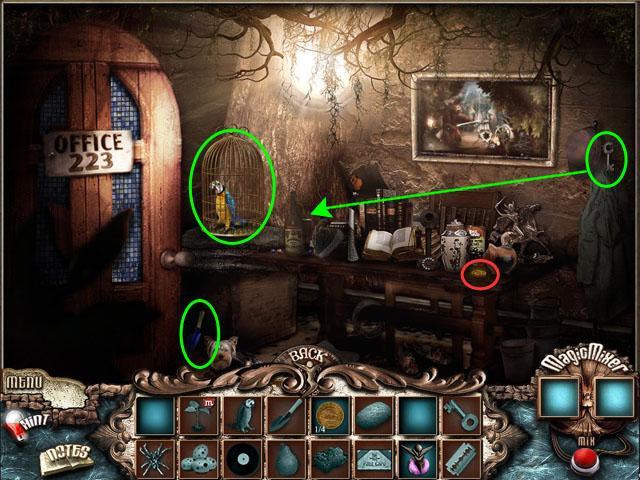
Take the KEY from the right and use it on the bird cage.
Collect the PARROT, the SHOVEL, and the COIN.
Return to the previous scene.
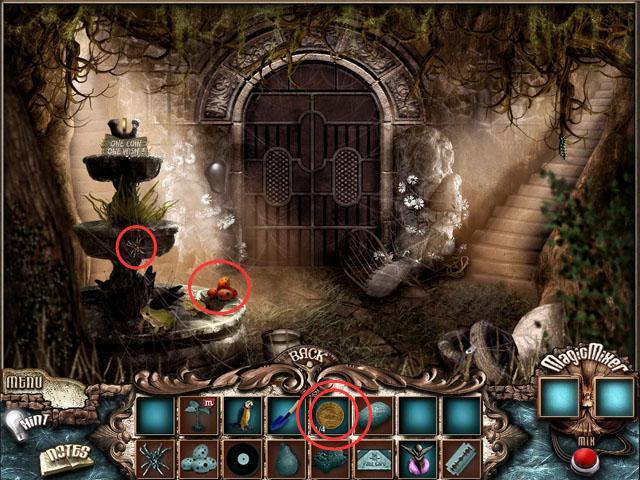
Use the COINS you have on the fountain.
Collect the SPIDER and the EGGS that appear.
Go back one more scene.
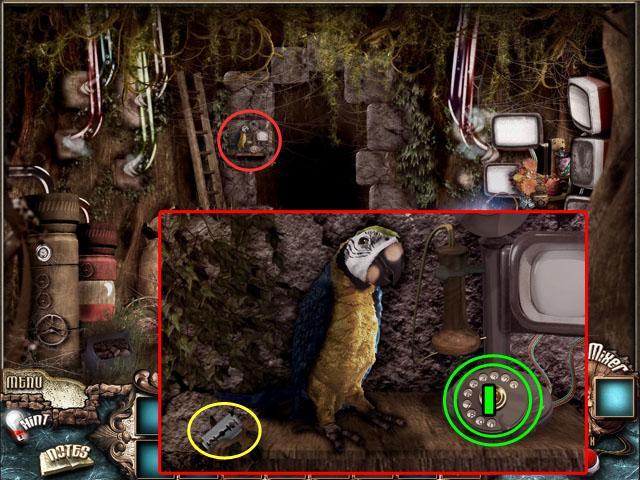
Use the PARROT on the phone beside the door.
Collect the RAZOR BLADE to the left of the parrot.
Click on the speaker to pick up the phone and type in the numbers 223 (I).
还记得上面那个办公室门上面的数字吗?这里就用上了,223,注意这是那种老式拨号电话机,每按下一个数字要听到声音之后再按下一个数字,不要连着按很快。
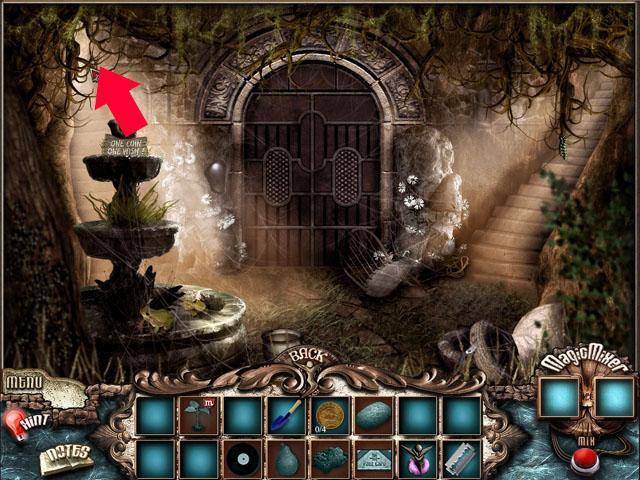
Return to the fountain scene and go up the stairs to the left.
Collect the pair.
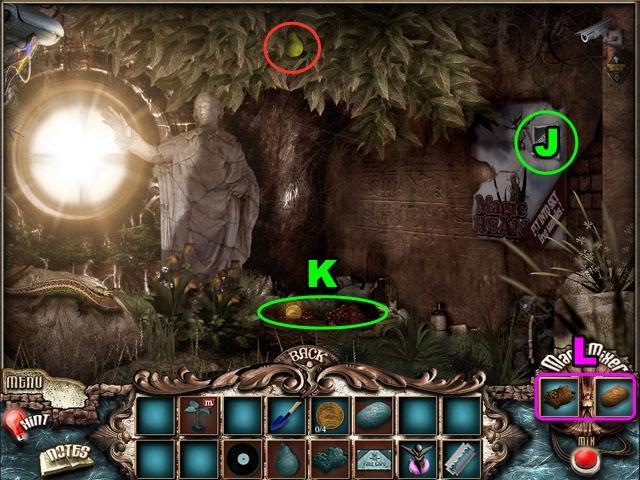
Use the RAZOR BLADE on the poster and collect the SEED (J).
Use the SHOVEL on the patch of dirt at the bottom (K) and collect COIN and the DIRT.
Combine the DIRT and the SEED in the Magic Mixer to make a PLANT (L).
Return to the fountain and use your last COIN to get a RECORD.
Go back to the first scene, and click the desk with the monitors.
Click the alarm button again to move the guard.
Travel again to office 223, to the right of the fountain room.
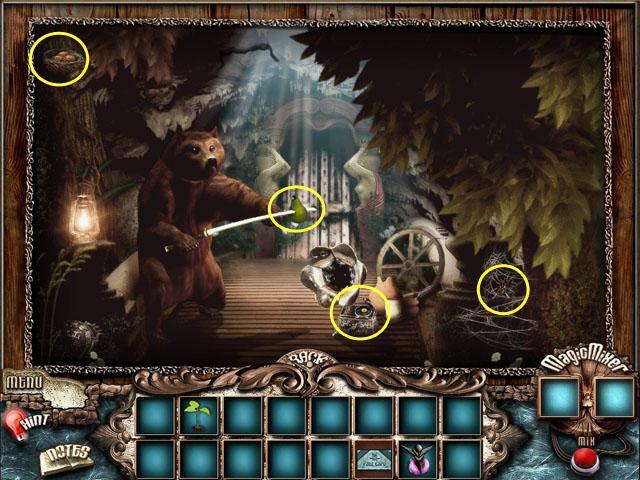
Click on the painting on the wall.
Add the PEAR, EGGS, RECORD and SPIDER to the correct locations on the image.
You will receive a PASS CARD.
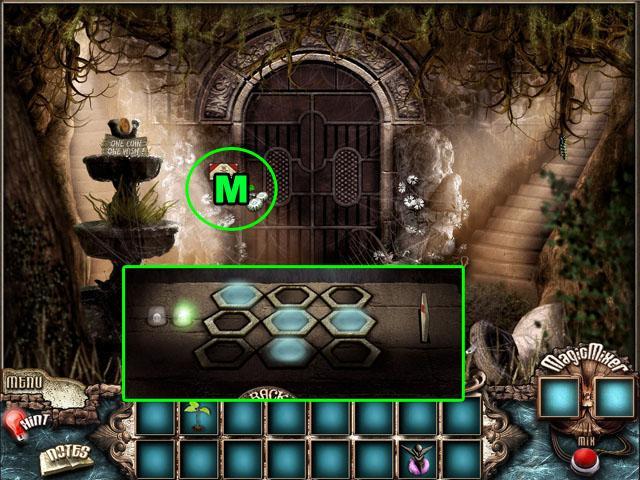
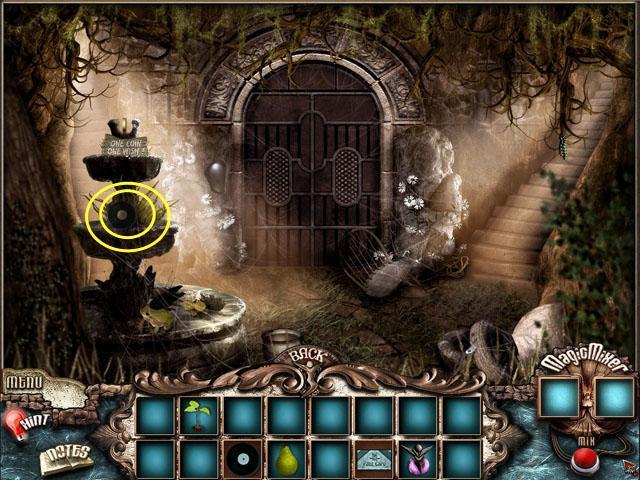
Return to the fountain and use the PASS CARD on the slot next to the door (M).
Click all of the lights to match the pattern on the pass card until the light turns green.
Exit the lock and go through the door.
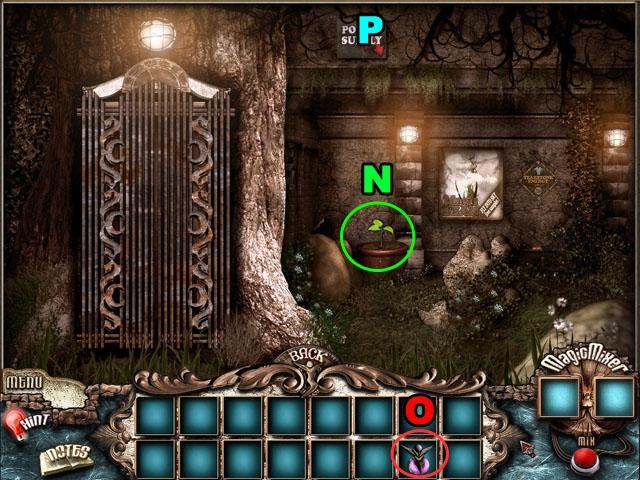
Use the PLANT in the pot of dirt (N) and use the MAGIC BOTTLE on the potted plant (O).
Click on the power supply at the top of the bean stock (P).
The object of this minigame is to fill in all of the selected spaces with only the pieces available.
There is a number beside each type of piece that tells you how many of that type you have left.
As there are no pieces over 3 or under 2, you can first add two straight pieces to the square of 4 at the top of the puzzle.
The 'arms' on the left and right can only be filled by one piece as well. Use these spaces as starting places to finish the rest of the puzzle.
See the screenshot for the complete solution.
Go back to the previous scene and enter the elevator.
[page]
第五章 Chapter 5
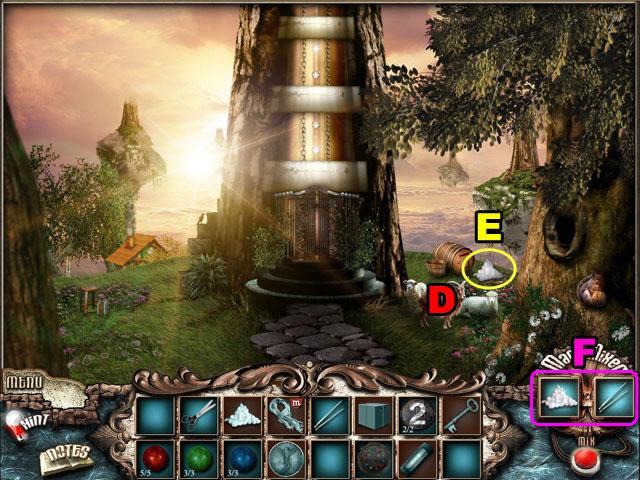
Collect the GREEN BALL and the BLUE BALL.
Go towards the cottage.
Collect the different COLORED BALLS and 2 COIN.
Travel forward again.
Collect the different COLORED BALLS around the airship.
Collect the WALNUT on the branch to the right.
Return to the first scene.
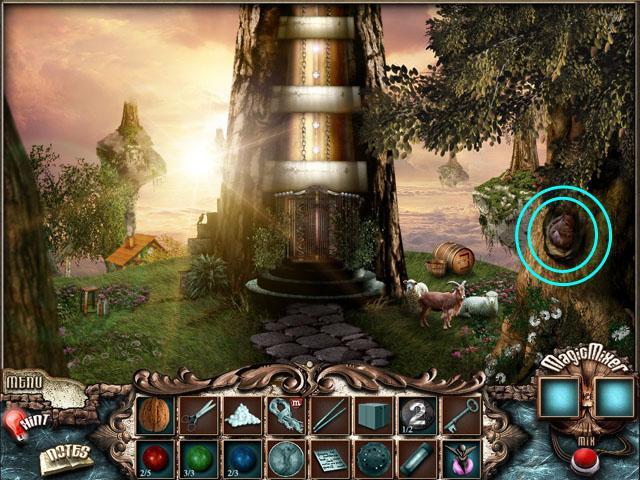
Place the WALNUT to the right of the squirrel in the tree.
Enter the hollow in the tree.
Use the MAGIC BOTTLE on the crown in the middle (A).
Collect the TWO RED BALLS in the crown and the 2 COIN at the left.
Take the NEEDLES on the line.
Travel to the cottage.
Click on the door to the cottage.
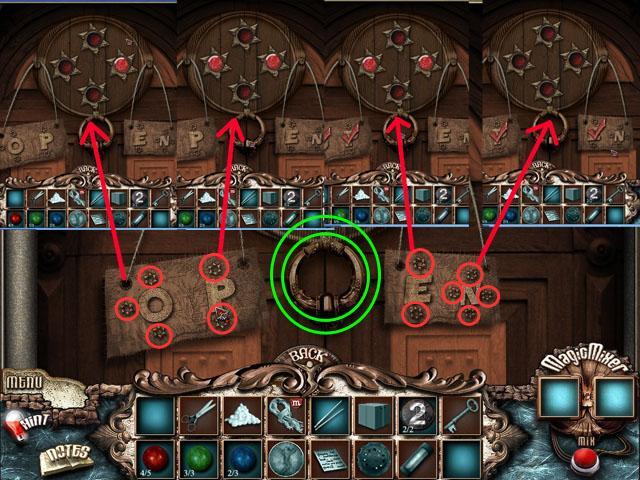
Solve this mini-game by inputting the correct combination on the door.
Each letter has a pattern of buttons around it.
Push the buttons that correspond with the letter 'O' and the click on the knocker in the middle of the door.
Do this three more times with 'P', 'E' and 'N' and the door will open.
See the screenshot for the correct combinations.
Enter the cottage.
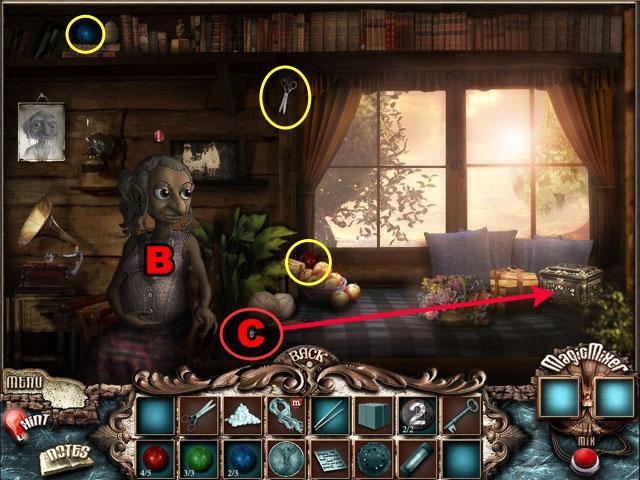
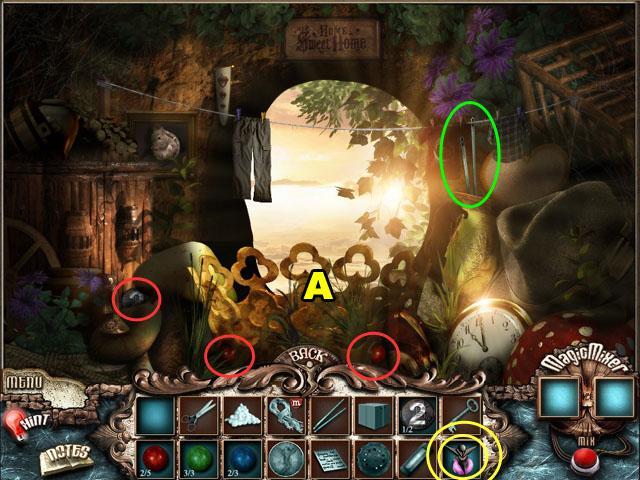
Talk to the pregnant woman (B).
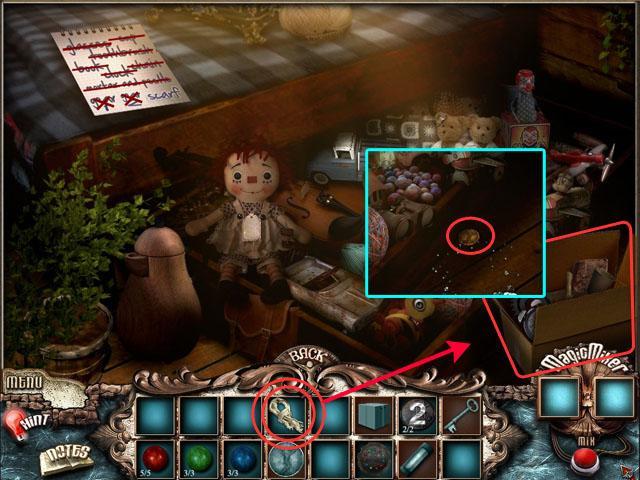
Collect the RED BALL, the BLUE BALL and the SCISSORS.
Use the LIST (C) on the box in the corner of the bed.
Click on the jewelry box.

Collect all of the objects from the list that are in this scene, circled in green.
You will receive a MACHINE PART in your inventory.
You will not be able to collect the scarf yet.
Leave the scene and go to the first location.
Use the SCISSORS on the sheep (D) and collect the WOOL (E).
Combine the WOOL and the SCISSORS in the Magic Mixer to get a SCARF (F).
Return to the jewelry box.
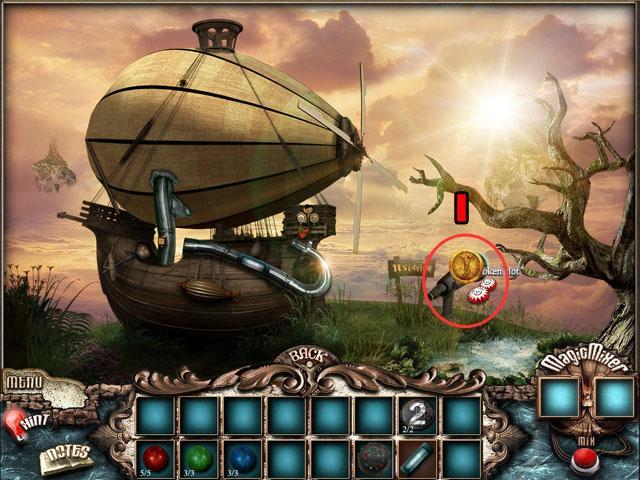
Use the rope on the CARTON and collect it.
Collect the TOKEN underneath the CARTON.
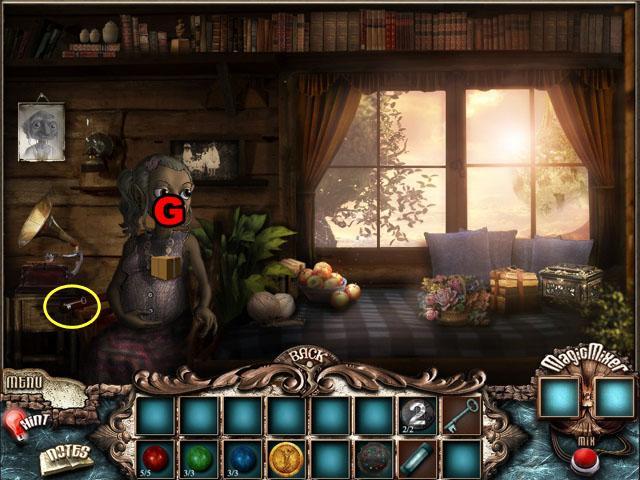
Give the CARTON to pregnant woman and collect the KEY from her (G).

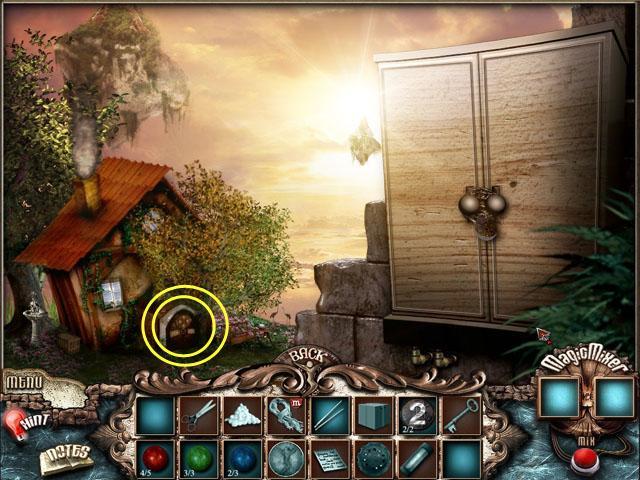
Exit the cottage and use the KEY on the cabinet (H).
Click on the cabinet to inspect it.
Click and drag the machine pieces from the right and the left to the correct position.
If you drop them in the wrong position they will snap back to the wall where they are hanging.
When you have placed all of the pieces use the MACHINE PART to finish the machine.
See the screenshot for the correct solution.
Exit the cabinet and go to the airship scene.
Use the TOKEN on the telescope and look through it (I).
Click one section and then another to switch their places until you have completed the puzzle.
There are small sections between each piece that are locked in place to help you figure out which piece goes where.
Use the sign on the very right side to start and work your way towards the left.
See the screenshot for the completed puzzle.
You will receive the passcode EW 5263.
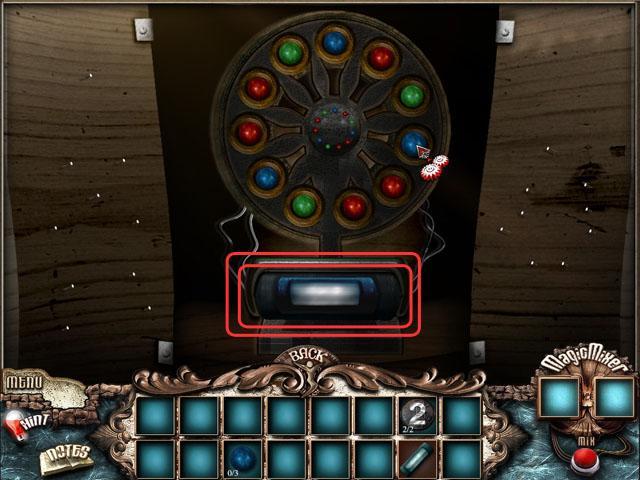
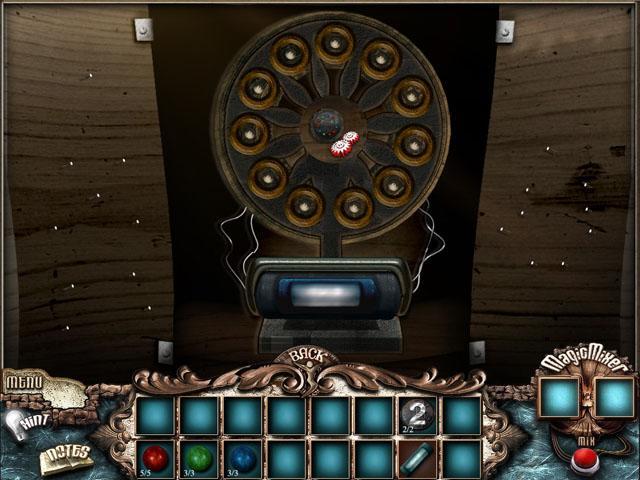
Return to the cabinet puzzle and place all of the COLORED BALLS from your inventory in the matching slots.
The slots will have a smaller ball of the same color in the middle on the machine part.
See the screenshot for the correct locations.
Take the BIOFUEL canister from the completed puzzle.
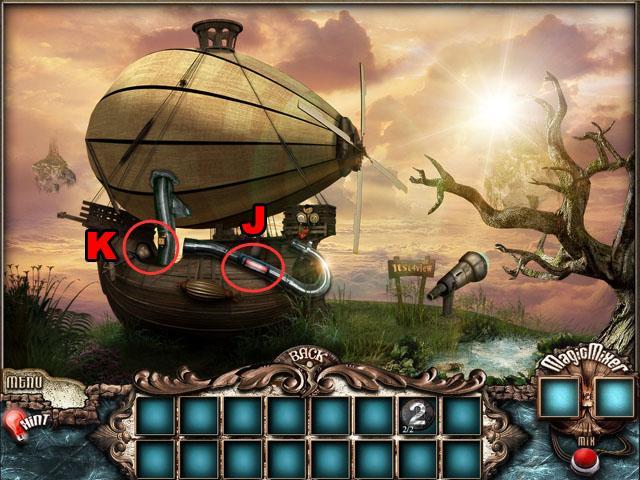
Travel to the airship and use the BIOFUEL on the pipe on the side of the ship (J).
Inspect the puzzle at the top of the ship (K).
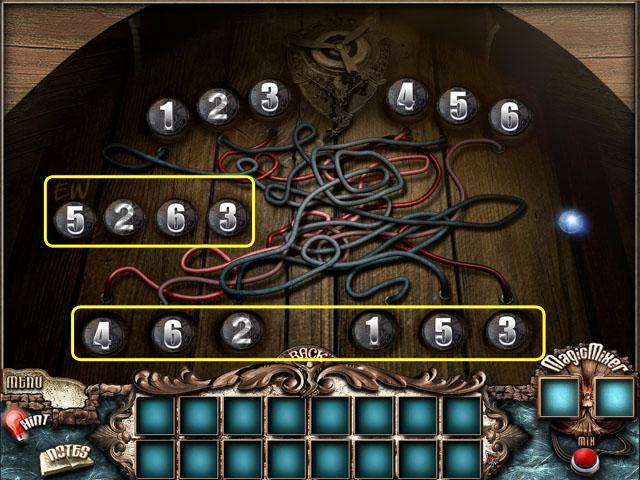
This puzzle has two parts where you need to fill in the correct numbers to solve it.
There is no 2 button, so you will need to use the 2 COINS from your inventory in the correct slots.
The correct code for the middle left 4 slots is from the telescope 5263.
The correct code for the bottom numbers can be found by following the wires from the top to the bottom of the screen and seeing which connect to each other.
See the screenshot for the solution.
后面几关攻略:https://www.81256.com/forum.php?mod=viewthread&tid=2201&extra=page%3D1
小编推荐:
热门推荐
更多 -

- 与八尺大人的夏天回忆汉化冷狐
- 剧情养成 | 6.1 MB
- 2025.01.16 | 和八尺大人的夏天回顾汉...
-

- 夏哈塔
- 休闲益智 | 121.65 MB
- 2024.08.16 | 游戏简介夏哈塔手游,带...
-

- 卡在墙上的女孩2
- 休闲益智 | 21 MB
- 2024.06.01 | 游戏简介卡在墙上的女孩2...
-

- 地下教育录冷狐
- 剧情养成 | 551.3 MB
- 2025.01.16 | re地下教ru育录是一款富...
-

- 3D工口医存档
- 角色扮演 | 15.2 MB
- 2024.01.06 | 手游描述 ...
-
- 触摸深睡巴比伦游戏汉化
- 剧情养成 | 244.4 MB
- 2025.01.16 | 触摸深睡巴比伦手游汉化...
-

- beastbeat2.5.1
- 休闲益智 | 121.65 MB
- 2024.07.19 | 游戏简介beastbeat2 5 ...
-
- 流氓先生
- 飞行射击 | 14.65 MB
- 2024.08.31 | 流氓先生是一款非常好玩...
-

- 3d工口医全解锁
- 角色扮演 | 15.2 MB
- 2024.01.06 | 手游描述 ...
-

- 流氓牛仔Vs外星人
- 动作冒险 | 132.47 MB
- 2024.11.30 | 手游描述 ...
-
- 神里绫华触摸模拟器桃子移植
- 剧情养成 | 109.5 MB
- 2025.01.16 | 神里绫华触摸模拟器是一...
-

- 3d工口医安卓中文
- 角色扮演 | 15.2 MB
- 2024.01.06 | 手游描述 ...
-

- 校园检查员
- 模拟经营 | 20 MB
- 2024.02.19 | 游戏简介校园检查员是一...
-
- 冷狐隶属洗脑孵化者直装
- 动作冒险 | 303.8 MB
- 2025.02.14 | 冷狐隶属洗脑RPG孵化者安...
-

- 椰羊甘雨触摸产奶过程
- 角色扮演 | 36.2 MB
- 2025.02.14 | 椰羊甘雨触摸产奶过程安...
热门文章
更多 -
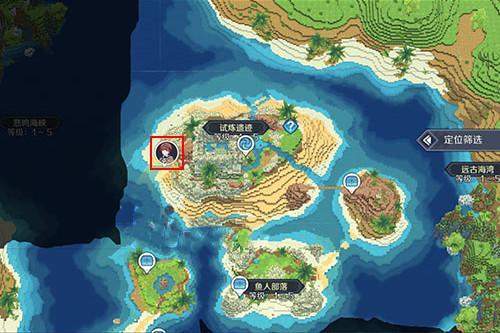
- 神角技巧试炼岛高级宝箱在什么位置
-
2021-11-05 11:52
手游攻略
-
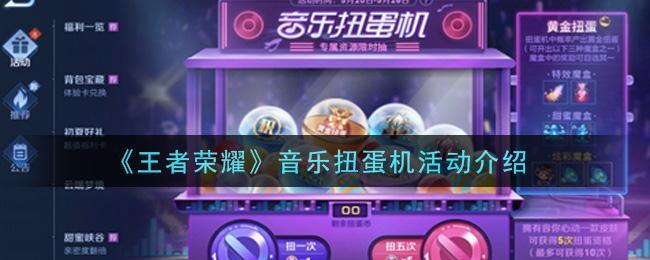
- 王者荣耀音乐扭蛋机活动内容奖励详解
-
2021-11-19 18:38
手游攻略
-
- 坎公骑冠剑11
-
2021-10-31 23:18
手游攻略
-

- 原神卡肉是什么意思
-
2022-06-03 14:46
游戏资讯
-

- 《臭作》之100%全完整攻略
-
2025-06-28 12:37
单机攻略