Angular 2 官方推荐使用 TypeScript 进行开发。本文将指导你从零开始搭建 Angular 2 TypeScript 开发环境,涵盖依赖安装、核心配置文件编写、组件创建及项目运行验证,帮助你快速上手 Angular 2 应用开发。
安装必要依赖与镜像配置
在开始之前,请确保已安装 npm。由于 npm 官方镜像在国内访问较慢,推荐使用淘宝 npm 镜像(cnpm)加速依赖安装。
$ npm install -g cnpm --registry=https://registry.npmmirror.com安装完成后,即可使用 cnpm 命令替代 npm 进行模块安装。
创建项目目录与核心配置文件
创建项目目录
$ mkdir angular-quickstart
$ cd angular-quickstart
编写核心配置文件
Angular 项目需要以下配置文件来管理依赖、编译规则和模块加载:
- package.json:标记项目所需的 npm 依赖包及脚本命令。
- tsconfig.json:定义 TypeScript 编译器如何将源码转换为 JavaScript。
- typings.json:为 TypeScript 编译器无法识别的库提供额外类型定义。
- systemjs.config.js:配置模块加载器,指定应用模块路径及依赖包注册。
在 angular-quickstart 目录下依次创建以下文件:
package.json
{
  "name": "angular-quickstart",
  "version": "1.0.0",
  "scripts": {
    "start": "tsc && concurrently \"npm run tsc:w\" \"npm run lite\" ",
    "lite": "lite-server",
    "postinstall": "typings install",
    "tsc": "tsc",
    "tsc:w": "tsc -w",
    "typings": "typings"
  },
  "license": "ISC",
  "dependencies": {
    "@angular/common": "2.0.0",
    "@angular/compiler": "2.0.0",
    "@angular/core": "2.0.0",
    "@angular/forms": "2.0.0",
    "@angular/http": "2.0.0",
    "@angular/platform-browser": "2.0.0",
    "@angular/platform-browser-dynamic": "2.0.0",
    "@angular/router": "3.0.0",
    "@angular/upgrade": "2.0.0",
    "core-js": "^2.4.1",
    "reflect-metadata": "^0.1.3",
    "rxjs": "5.0.0-beta.12",
    "systemjs": "0.19.27",
    "zone.js": "^0.6.23",
    "angular2-in-memory-web-api": "0.0.20",
    "bootstrap": "^3.3.6"
  },
  "devDependencies": {
    "concurrently": "^2.2.0",
    "lite-server": "^2.2.2",
    "typescript": "^2.3.4",
    "typings":"^1.3.2"
  }
}
tsconfig.json
{
  "compilerOptions": {
    "target": "es5",
    "module": "commonjs",
    "moduleResolution": "node",
    "sourceMap": true,
    "emitDecoratorMetadata": true,
    "experimentalDecorators": true,
    "removeComments": false,
    "noImplicitAny": false
  }
}
typings.json
{
  "globalDependencies": {
    "core-js": "registry:dt/core-js#0.0.0+20160725163759",
    "jasmine": "registry:dt/jasmine#2.2.0+20160621224255",
    "node": "registry:dt/node#6.0.0+20160909174046"
  }
}
systemjs.config.js
/**
 * System configuration for Angular samples
 * Adjust as necessary for your application needs.
 */
(function (global) {
  System.config({
    paths: {
      // paths serve as alias
      'npm:': 'node_modules/'
    },
    // map tells the System loader where to look for things
    map: {
      // our app is within the app folder
      app: 'app',
      // angular bundles
      '@angular/core': 'npm:@angular/core/bundles/core.umd.js',
      '@angular/common': 'npm:@angular/common/bundles/common.umd.js',
      '@angular/compiler': 'npm:@angular/compiler/bundles/compiler.umd.js',
      '@angular/platform-browser': 'npm:@angular/platform-browser/bundles/platform-browser.umd.js',
      '@angular/platform-browser-dynamic': 'npm:@angular/platform-browser-dynamic/bundles/platform-browser-dynamic.umd.js',
      '@angular/http': 'npm:@angular/http/bundles/http.umd.js',
      '@angular/router': 'npm:@angular/router/bundles/router.umd.js',
      '@angular/forms': 'npm:@angular/forms/bundles/forms.umd.js',
      // other libraries
      'rxjs':                       'npm:rxjs',
      'angular2-in-memory-web-api': 'npm:angular2-in-memory-web-api',
    },
    // packages tells the System loader how to load when no filename and/or no extension
    packages: {
      app: {
        main: './main.js',
        defaultExtension: 'js'
      },
      rxjs: {
        defaultExtension: 'js'
      },
      'angular2-in-memory-web-api': {
        main: './index.js',
        defaultExtension: 'js'
      }
    }
  });
})(this);
配置文件创建完成后,执行以下命令安装依赖:
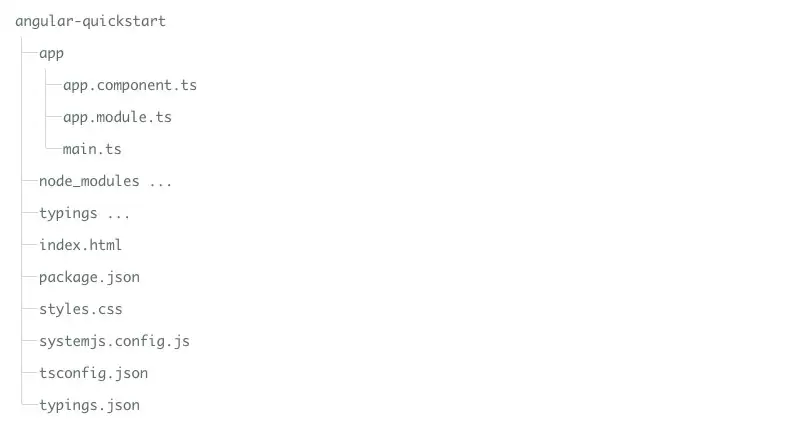
$ cnpm install安装成功后,项目目录下将生成 node_modules 文件夹,包含运行所需的所有模块。此时项目结构如下:

构建 Angular 应用模块与组件
Angular 使用 NgModules 组织功能相关的代码块。每个应用至少需要一个根模块(Root Module),本例中为 AppModule。
创建根模块
在 angular-quickstart 目录下创建 app 文件夹,并在其中新建 app.module.ts:
import { NgModule }      from '@angular/core';
import { BrowserModule } from '@angular/platform-browser';
@NgModule({
  imports:      [ BrowserModule ]
})
export class AppModule { }
由于是浏览器端应用,需从 @angular/platform-browser 导入 BrowserModule 并加入 imports 数组。
创建根组件
每个 Angular 应用至少包含一个根组件,本例为 AppComponent。在 app 目录下创建 app.component.ts:
import { Component } from '@angular/core';
@Component({
selector: 'my-app',
template: '我的第一个 Angular 应用
'
})
export class AppComponent { }代码说明:
- 从
@angular/core引入Component装饰器。 @Component将元数据绑定到组件类,selector定义 HTML 标签选择器,template指定视图渲染内容。export使组件可在外部文件中引用。
更新 app.module.ts,导入 AppComponent 并注册到 declarations 和 bootstrap 中:
import { NgModule }      from '@angular/core';
import { BrowserModule } from '@angular/platform-browser';
import { AppComponent }   from './app.component';
@NgModule({
  imports:      [ BrowserModule ],
  declarations: [ AppComponent ],
  bootstrap:    [ AppComponent ]
})
export class AppModule { }
创建应用启动入口
在 app 目录下创建 main.ts,用于初始化平台并启动模块:
import { platformBrowserDynamic } from '@angular/platform-browser-dynamic';
import { AppModule } from './app.module';
const platform = platformBrowserDynamic();
platform.bootstrapModule(AppModule);
定义宿主页面与样式
在 angular-quickstart 根目录创建 index.html 作为应用宿主页面:
Angular 2 实例 - 菜鸟教程(runoob.com)
Loading...
关键说明:
core-js提供旧版浏览器兼容填充,zone.js和reflect-metadata为 Angular 运行必需,SystemJS负责模块加载。- 通过
System.import('app')动态加载并执行main.ts中的启动逻辑。
添加基础样式
在根目录创建 styles.css 定义页面样式:
/* Master Styles */
h1 {
  color: #369;
  font-family: Arial, Helvetica, sans-serif;
  font-size: 250%;
}
h2, h3 {
  color: #444;
  font-family: Arial, Helvetica, sans-serif;
  font-weight: lighter;
}
body {
  margin: 2em;
}
编译并运行应用程序
在终端中执行以下命令启动开发服务器:
npm start打开浏览器访问 https://localhost:3000/,即可看到应用运行结果:

至此,Angular 2 TypeScript 环境配置与基础应用搭建完成。最终项目目录结构如下: