
人脸识别技术如今遍地开花,拿来做个智能锁,再合适不过了。想象一下:摄像头捕捉到你,系统一秒认出你是“自己人”,门锁自动弹开,顺便还能发条信息通知你——谁、什么时候进了房间。下面我们就一步步把这事儿搭起来。
硬件连接
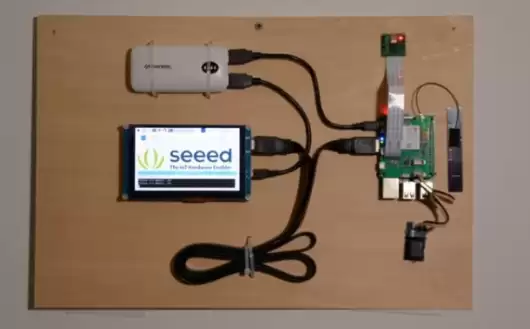
这个项目里,我们要拍照、识别人脸,然后把结果展示在屏幕上。如果是已认证的面孔,就开门,再通过信息把开门人的信息发到指定号码。硬件方面,把摄像头接到树莓派的摄像头接口,天线和Grove继电器装到LTE Pi HAT上,再把HAT插到Pi上。屏幕通过HDMI线连到树莓派,别忘了给屏幕和Pi都接上电源。
软件编程
人脸识别
下面这几步,教你在Pi上搞定人脸识别。
步骤 1. 用 raspi-config 配置摄像头和GPU内存:
sudo raspi-config选择 Interface Options -- Camera 启用 picamera,然后进 Advanced Options -- Memory Split 把GPU内存改成64。改完重启树莓派。
步骤 2. 安装所需库:
sudo apt-get update
sudo apt-get upgrade
sudo apt-get install build-essential cmake gfortran git wget curl graphicsmagick libgraphicsmagick1-dev libatlas-dev liba vcodec-dev liba vformat-dev libboost-all-dev libgtk2.0-dev libjpeg-dev liblapack-dev libswscale-dev pkg-config python3-dev python3-numpy python3-picamera python3-pip zip
sudo apt-get clean
步骤 3. 让 picamera 支持数组:
sudo pip3 install --upgrade picamera[array]步骤 4. 安装 dlib 和人脸识别库:
sudo pip3 install dlib
sudo pip3 install face_recognition
步骤 5. 下载并运行人脸识别示例:
git clone --single-branch https://github.com/ageitgey/face_recognition.git
cd ./face_recognition/examples
python3 facerec_on_raspberry_pi.py
注意:如果报错 ImportError: libatlas.so.3: cannot open shared object file: No such file or directory,运行下面这条命令修复:
sudo apt-get install libatlas3-base中继
人脸识别跑通之后,可以加功能了。把 Grove 继电器接到 LTE Cat 1 Pi HAT 上——注意,用的是数字端口,不是 I2C 端口。
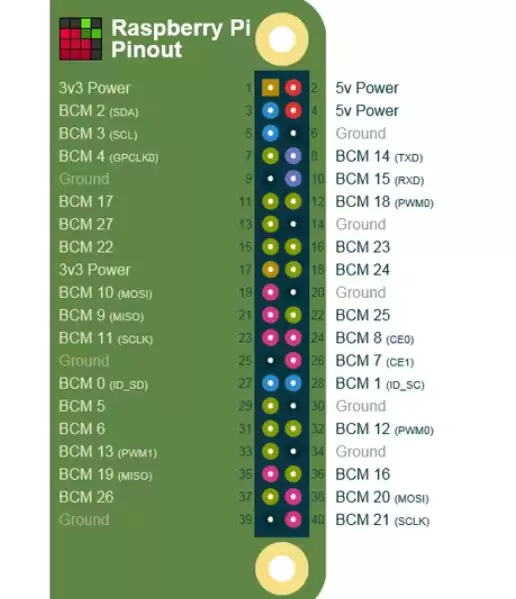
从树莓派 3B 的引脚图可以看到,SDA 和 SCL 引脚分别在板子的 pin 3 和 pin 5。所以我们往 pin 5 输出数字信号就能控制继电器。在 Pi 上跑下面这段 Python 代码,要是没问题,你会听到继电器“嘀嗒”一声:
import RPi.GPIO as GPIO
RELAY_PIN = 5
GPIO.setmode(GPIO.BOARD)
GPIO.setup(RELAY_PIN, GPIO.OUT)
GPIO.output(RELAY_PIN, GPIO.HIGH)大致的思路是:从文件夹里加载已知人脸,识别摄像头拍到的人脸;如果匹配上了,就控制继电器解锁门。我们可以把这些封装成一个类,里面有两个核心方法——load_known_faces() 和 unlock()。完整的程序可以在文末下载。
def load_known_faces(self):
    known_faces = os.listdir(self.__known_faces_path)
    for known_face in known_faces:
        self.__known_faces_name.append(known_face[0 : len(known_face) - len('.jpg')])
        known_face_image = face_recognition.load_image_file(self.__known_faces_path + known_face)
        self.__known_faces_encoding.append(face_recognition.face_encodings(known_face_image)[0])
    return len(self.__known_faces_encoding)

def unlock(self):
    if self.__matched.count(True) > 0:
        GPIO.output(self.__relay_pin, GPIO.HIGH)
        print('Door opened')
        time.sleep(5)
        GPIO.output(self.__relay_pin, GPIO.LOW)
        self.__reset_recognise_params()
        return True
    self.__retry_count += 1
    print('Please try again...{}'.format(self.__retry_count))
    return False
超然思考
更进一步,我们还可以把识别到的图片显示在屏幕上。PIL 和 matplotlib 这两个库能帮上忙——不过 matplotlib 需要手动安装,在终端执行:
sudo pip3 install matplotlib把库导入代码,然后在 unlock() 方法里改一下 if 块:
img = Image.open('{}/{}.jpg'.format(self.__known_faces_path, self.__known_faces_name[0]))
plt.imshow(img)
plt.ion()
GPIO.output(self.__relay_pin, GPIO.HIGH)
print('Door opened')
plt.pause(3)
plt.close()
GPIO.output(self.__relay_pin, GPIO.LOW)
self.__reset_recognise_params()
return True
这样一来,人脸匹配成功后,文件夹里的对应图片就会显示在屏幕上。
信息
有时候我们想知道到底是谁进了房间——这时候 LTE Cat 1 Pi HAT 就能派上用场了。把 SIM 卡插进去,按下面步骤测试能否正常工作。
步骤 1. 在树莓派中启用 UART0
用 nano 编辑 /boot/config.txt:
sudo nano /boot/config.txt在文件底部加上 dtoverlay=pi3-disable-bt,然后禁用 hciuart 服务:
sudo systemctl disable hciuart接着在 /boot/cmdline.txt 中删掉 console=serial0,115200:
sudo nano /boot/cmdline.txt一切改好之后重启树莓派。
步骤 2. 下载示例并运行
cd ~
git clone https://github.com/Seeed-Studio/ublox_lara_r2_pi_hat.git
cd ublox_lara_r2_pi_hat
sudo python setup.py install
cd test
sudo python test01.py
如果终端输出类似下面这样的信息,说明 LTE Cat 1 Pi HAT 工作正常:
40-pin GPIO header detected
Enabling CTS0 and RTS0 on GPIOs 16 and 17
rts cts on
waking up...
module name:  LARA-R211
RSSI:  3
知道 HAT 好用之后,怎么用它发信息呢?关键是理解树莓派通过 UART 发送 AT 命令与 HAT 通信。下面这段 Python 代码可以帮你发送 AT 命令到 LTE HAT:
from ublox_lara_r2 import *
u = Ublox_lara_r2()
u.initialize()
u.reset_power()
# Close debug massage
u.debug = False
u.sendAT('')
发送信息的 AT 指令序列如下:
AT+CMGF=1
AT+CMGS=
下面是 __send_sms() 方法的实现:
def __send_sms(self):
    if self.__phonenum == None:
        return False
    for unlocker in self.__recognise_face_names():
        if self.__ublox.sendAT('AT+CMGF=1\r\n'):
            print(self.__ublox.response)
        if self.__ublox.sendAT('AT+CMGS="{}"\r\n'.format(self.__phonenum)):
            print(self.__ublox.response)
        if self.__ublox.sendAT('{} enter the room.\x1a'.format(unlocker)):
            print(self.__ublox.response)