
此前我们深入解析了大模型精度(FP16、FP32、BF16)的详细原理,今天进入实战环节,聚焦两个最受关注的问题:一是模型在不同精度下到底占用多少显存,二是这些精度之间如何进行转换。下面直接通过实验来验证。
不同精度下模型显存占用实测
实验环境采用 NVIDIA A40 48G 显卡,模型选择 llama-2-7b-hf[1]。首先查看模型的 config.json 文件,发现其默认的保存精度是 torch_dtype: "float16"。
第一步,输出相关版本号及显卡信息:
import transformers
from transformers import AutoModelForCausalLM, AutoTokenizer
import torch

# 打印版本号
print("transformers version:", transformers.__version__)
print("torch version:", torch.__version__)

# 检查系统中是否有可用的 GPU
if torch.cuda.is_a vailable():
    # 获取可用的 GPU 设备数量
    num_devices = torch.cuda.device_count()
    print("可用 GPU 数量:", num_devices)

    # 遍历所有可用的 GPU 设备并打印详细信息
    for i in range(num_devices):
        device = torch.cuda.get_device_properties(i)
        print(f"nGPU {i} 的详细信息:")
        print("名称:", device.name)
        print("计算能力:", f"{device.major}.{device.minor}")
        print("内存总量 (GB):", round(device.total_memory / (1024**3), 1))
else:
    print("没有可用的 GPU")

# 结果
transformers version: 4.32.1
torch version: 2.0.1+cu117
可用 GPU 数量: 1

GPU 0 的详细信息:
名称: NVIDIA A40
计算能力: 8.6
内存总量 (GB): 44.4
接着加载模型,并明确指定使用 float16 精度:
# 加载模型
model_name = "/path/to/llama-2-7b-hf" # 你模型存放的位置
model = AutoModelForCausalLM.from_pretrained(model_name, device_map="cuda:0", torch_dtype=torch.float16)
查看模型总参数量:
total_parameters = model.num_parameters()
print("Total parameters in the model:", total_parameters)

# 结果
Total parameters in the model: 6738415616 # 6.73B
float16 格式下每个参数占 2 字节,理论显存占用计算如下:
# 计算每个参数的大小(以字节为单位)
size_per_parameter_bytes = 2

# 计算模型在显存中的总空间(以字节为单位)
total_memory_bytes = total_parameters * size_per_parameter_bytes

# 将字节转换为更常见的单位(GB)
total_memory_gb = total_memory_bytes / (1024**3)

print("Total memory occupied by the model in MB:", total_memory_gb)

# 结果
Total memory occupied by the model in GB: 12.551277160644531
利用 PyTorch 的 memory_allocated 函数实际计算当前显存占用:
# 计算模型的显存占用
memory_allocated = torch.cuda.memory_allocated(device='cuda:0')

# 将字节转换为更常见的单位(GB)
memory_allocated_gb = memory_allocated / (1024**3)

print("Memory allocated by the model in GB:", memory_allocated_gb)

# 结果
Memory allocated by the model in GB: 12.582542419433594
通过 nvidia-smi 命令查看实际显存使用情况:
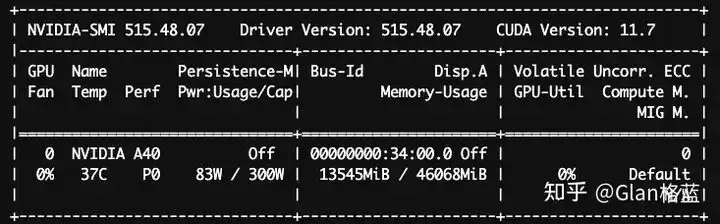
可以看出,理论估算值(12.55GB)、PyTorch 报告值(12.58GB)以及 nvidia-smi 显示的数值高度吻合。细微的误差主要源于框架本身(如 PyTorch、transformers)以及 GPU 缓存等额外开销。
采用相同的实验流程,改用 float32 加载模型,这里仅展示关键结果:
# 加载模型float32
model = AutoModelForCausalLM.from_pretrained(model_name, device_map="cuda:0", torch_dtype=torch.float32)

......

# 结果
Total memory occupied by the model in GB: 25.102554321289062
Memory allocated by the model in GB: 25.165069580078125
nvidia-smi 截图结果:
接下来测试 bfloat16 精度:
# 加载模型bfloat16
model = AutoModelForCausalLM.from_pretrained(model_name, device_map="cuda:0", torch_dtype=torch.bfloat16)

......

# 结果
Total memory occupied by the model in GB: 12.551277160644531
Memory allocated by the model in GB: 12.582542419433594
nvidia-smi 截图:
由此可见,bfloat16 与 float16 的显存占用完全相同,两者均为 16 位精度格式。
大模型不同精度之间的转换方法
既然 llama-2-7b-hf 原始保存的是 float16 精度,为何加载时能够指定 float32 或 bfloat16?答案在于 PyTorch 内置的数据类型转换函数。模型加载时,PyTorch 会逐一将每个参数的数据类型转换为目标精度。
# 对应float32
def float(self: T) -> T:
    r"""Casts all floating point parameters and buffers to ``float`` datatype.
    .. note::
    This method modifies the module in-place.
    Returns:
    Module: self
    """
    return self._apply(lambda t: t.float() if t.is_floating_point() else t)

# 对应float16
def half(self: T) -> T:
    r"""Casts all floating point parameters and buffers to ``half`` datatype.
    .. note::
    This method modifies the module in-place.
    Returns:
    Module: self
    """
    return self._apply(lambda t: t.half() if t.is_floating_point() else t)

# 对应bfloat16
def bfloat16(self: T) -> T:
    r"""Casts all floating point parameters and buffers to ``bfloat16`` datatype.
    .. note::
    This method modifies the module in-place.
    Returns:
    Module: self
    """
    return self._apply(lambda t: t.bfloat16() if t.is_floating_point() else t)
这些转换函数也可以在模型加载完成后手动调用。例如,先以 float32 加载模型,再将其转换为 float16:
# 以float32加载
model = AutoModelForCausalLM.from_pretrained(model_name, device_map="cuda:0", torch_dtype=torch.float32)
# 计算模型的显存占用
memory_allocated = torch.cuda.memory_allocated(device='cuda:0')
# 将字节转换为更常见的单位(GB)
memory_allocated_gb = memory_allocated / (1024**3)
print("Memory allocated by the model in GB:", memory_allocated_gb)

# 转为float16
model.half()
# 计算模型的显存占用
memory_allocated = torch.cuda.memory_allocated(device='cuda:0')
# 将字节转换为更常见的单位(GB)
memory_allocated_gb = memory_allocated / (1024**3)
print("Memory allocated by the model in GB:", memory_allocated_gb)

# 结果
Memory allocated by the model in GB: 25.165069580078125
Total memory occupied by the model in GB: 12.551277160644531
反过来,也可以先以 float16 加载,再转换为 float32:
# 以float16加载
model = AutoModelForCausalLM.from_pretrained(model_name, device_map="cuda:0", torch_dtype=torch.float16)
# 计算模型的显存占用
memory_allocated = torch.cuda.memory_allocated(device='cuda:0')
# 将字节转换为更常见的单位(GB)
memory_allocated_gb = memory_allocated / (1024**3)
print("Memory allocated by the model in GB:", memory_allocated_gb)

# 转为float32
model.float()
# 计算模型的显存占用
memory_allocated = torch.cuda.memory_allocated(device='cuda:0')
# 将字节转换为更常见的单位(GB)
memory_allocated_gb = memory_allocated / (1024**3)
print("Memory allocated by the model in GB:", memory_allocated_gb)

# 结果
Memory allocated by the model in GB: 12.582542419433594
Total memory occupied by the model in GB: 25.165069580078125
转换函数的底层实现由 C++(CPU)和 CUDA(GPU)完成,其逻辑并不复杂。下面以一个 float32 转 float16 的例子来直观理解:
假设有一个单精度浮点数,其二进制表示为 0 10000000 10010001111010111000011,对应的十进制数值约为 3.1400。
- 符号位: 0,表示正数,直接保留。
- 指数位: 单精度 8 位指数(偏移 127)→ 半精度 5 位指数(偏移 15)。原指数 128,变换后为 128−127+15=16,二进制
10000。 - 尾数位: 截取前 10 位,原 23 位取前 10 位为
1001000111(注意实际截取时会做舍入,这里简化示意)。 - 合并后得到半精度二进制
0 10000 1001001001000,十进制约 3.140625。
来看 PyTorch 实际的转换结果:
import torch
# 创建一个单精度浮点数的张量
float_tensor = torch.tensor([3.14], dtype=torch.float32)
# 将张量转换为半精度浮点数
half_tensor = float_tensor.half()
# 打印转换后的张量及其数据类型
print("Original Tensor:n", float_tensor)
print("Half-Precision Tensor:n", half_tensor)

# 结果
Original Tensor:
 tensor([3.1400])
Half-Precision Tensor:
 tensor([3.1406], dtype=torch.float16)
反过来,float16 转 float32 的过程也是类似的。以半精度二进制 0 01101 1010000000(十进制约 3.140625)为例:
- 符号位: 0,复制到单精度。
- 指数位: 5 位指数 13,偏移调整 13−15+127=125,8 位二进制
01111101。 - 尾数位: 10 位补 0 扩展为 23 位:
10100000000000000000000。 - 合并后得到
0 01111101 10100000000000000000000,十进制仍约为 3.140625。
用 PyTorch 验证:
import torch

# 创建一个半精度浮点数的张量
float_tensor = torch.tensor([3.14], dtype=torch.float16)

# 将张量转换为单精度浮点数
single_tensor = float_tensor.float()

# 打印转换后的张量及其数据类型
print("Original Tensor:n", float_tensor)
print("Single-Precision Tensor:n", single_tensor)

# 结果
Original Tensor:
 tensor([3.1406], dtype=torch.float16)
Single-Precision Tensor:
 tensor([3.1406])
从以上实验可以清楚看出,float32 的精度确实高于 float16——原始数值 3.14 转为半精度后变为 3.1406,精度损失约 0.0006。本次实践全面覆盖了不同精度下模型显存占用的实测对比,以及精度转换的具体实现原理,希望对你在实际使用大模型时有所帮助。